Taking your Indonesian content and making it resonate with an English-speaking audience is a huge opportunity. But if you're just dropping text into a basic translator, you're likely losing the very soul of your message.
The real goal is to go beyond a literal, word-for-word translation. You need a process that keeps the original context, tone, and cultural vibe intact. It all comes down to picking the right approach and finding that sweet spot between automated efficiency and a necessary human touch.
Bridging The Gap Between Indonesian And English Content
Let's be honest, the biggest hurdle in any language translation from Indonesian to English isn't just finding the right words. It's about making sure the feeling and intent land perfectly with a totally different audience.
Traditional translation services, while often precise, can be a major bottleneck. They're slow and can get expensive fast, which is a dealbreaker when you need to publish content consistently.
This is where AI-powered platforms have completely changed the game. They tackle the grunt work—transcribing audio, creating subtitles, and giving you a solid first-pass translation in minutes, not days. This frees you up to do what a human does best: polishing the final output to make sure it’s culturally on-point and flows naturally.
Choosing Your Indonesian To English Translation Method
Deciding between a fully manual process and an AI-assisted one really depends on your project's needs—specifically your budget, deadline, and the type of content you're working with.
| Factor | Manual Human Translation | AI-Powered Tools (e.g., TranslateMom) |
|---|---|---|
| Speed | Slow (days or weeks) | Fast (minutes to hours) |
| Cost | High (per-word or per-hour rates) | Low (affordable subscription plans) |
| Scalability | Limited; difficult for large volumes | Excellent; easily handles bulk projects |
| Accuracy | High, especially with expert linguists | Very good, but needs human review for nuance |
| Best For | Legal documents, literary works, high-stakes marketing | Social media, corporate training, online courses, general video content |
For most creators and businesses today, the hybrid approach is the clear winner. You get the incredible speed of AI for the initial heavy lifting, followed by a quick human review to catch any subtle errors or awkward phrasing.
The Modern AI-Powered Workflow
Forget juggling different apps and hiring freelancers for each step. A tool like TranslateMom brings the entire process into one simple, browser-based studio. Whether you've got a detailed corporate training video or a snappy TikTok, you can manage the whole localization project without leaving the platform.
The workflow couldn't be more straightforward:
- Upload Your File: From the New Task screen, drag and drop your Indonesian video file or paste a link from YouTube, Instagram, or another platform.
- Set Your Languages: Select "Indonesian" as the source and "English" as the target language.
- Pick Your Service: Decide if you need English subtitles (Translation) or want to replace the original audio with an English voiceover (Dubbing).
- Refine and Polish: Jump into the Studio editor to tweak the captions, adjust the timing, and make sure everything is perfect before you export.
This all-in-one approach slashes the time and money you'd normally spend on translation. It puts captioning, translation, and dubbing tools right in your hands, so you're not trying to coordinate between multiple apps or agencies just to get one video done.
By combining the raw power of AI with easy-to-use editing tools, you can produce a high-quality language translation from Indonesian to English that genuinely connects with a global audience—all without the headaches and high costs of the old way.
Get Your Files Ready for a Flawless AI Translation
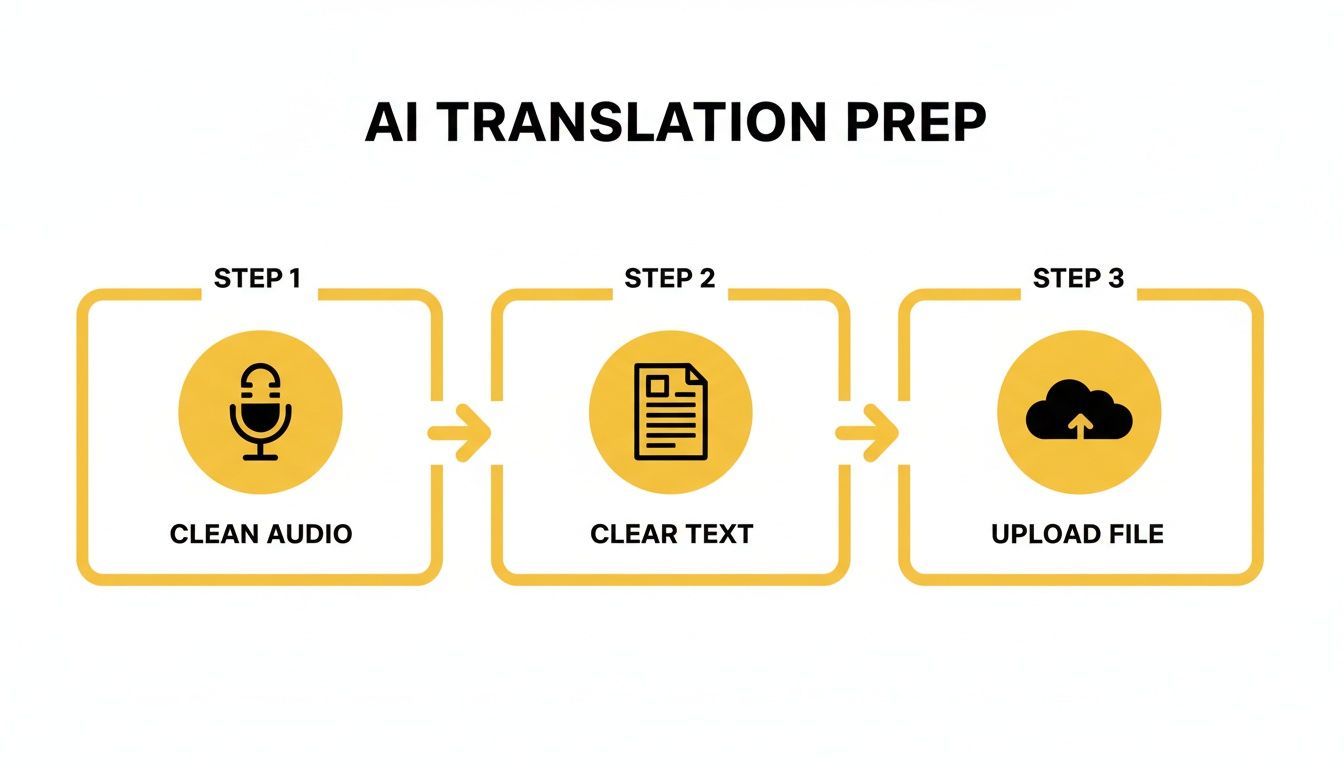
Ever heard the phrase "garbage in, garbage out"? It's the golden rule of AI translation. The quality of your final English translation will only ever be as good as the original Indonesian file you start with.
Taking just a few minutes to prep your files before you even think about uploading them can genuinely save you hours of painful editing on the back end.
For anything with sound—audio or video—your absolute number one priority has to be clean audio. Modern AI is pretty smart and can filter out some background fuzz, but it really shines when it has clear, easy-to-understand speech to work with. Do what you can to minimize background noise, echo, or people talking over each other. It will make a night-and-day difference in your initial transcription.
Pro Tip: If you're recording something new, just moving the mic closer to whoever is speaking is a game-changer. For files you already have, running a quick noise reduction filter in pretty much any audio editor is a step you won't regret before you start your Indonesian to English translation.
How to Tidy Up Your Source Files
Whether you're dealing with video, audio, or a simple text doc, a little bit of prep work goes a seriously long way. This isn't about chasing perfection; it's about getting rid of the obvious roadblocks for the AI.
- For Audio and Video: Make sure the main speaker's voice is front and centre. If you've got loud music or a lot of chatter in the background, the AI can get confused trying to separate the dialogue.
- For Text Documents: Strip out any weird formatting. Kill those random line breaks that show up in the middle of sentences and make sure your paragraphs actually flow logically.
- Fix Ambiguous Phrasing: If you're working from a script, give it a quick scan for any culturally specific idioms or phrases that don't have a direct English equivalent. Sometimes, just rephrasing a sentence or adding a quick note can steer the AI toward a much more natural-sounding result.
Getting your files into a tool like TranslateMom is dead simple. From the New Task screen, you can drag and drop video files—even big ones up to 5GB—or just paste in a link from YouTube, X (Twitter), or TikTok. You can even hit F on your keyboard to pop open the file picker. The whole process is designed to be painless so you can focus on the prep work that matters.
Why This Pre-Work Actually Matters
This isn't just about getting a slightly better translation. It’s about making your whole workflow faster and smoother. A clean source file gives you a much more accurate first draft from the AI, which means you spend way less time in the editor fixing silly mistakes.
Ultimately, when you give the AI the best possible input, you’re setting it up to give you an output that’s incredibly close to the finish line right from the start. For those looking to dive deeper, you can also learn more about how to translate audio to English effectively with these principles in mind. And if you're exploring the broader ecosystem, it's worth seeing what different AI content generators can bring to your overall content strategy.
Your AI-Powered Translation Workflow
Diving into an AI tool to handle your language translation from Indonesian to English shouldn't feel complicated. The whole point is to get from your original Indonesian video to a polished English version without the headache. Modern tools are built around a simple project flow, often just called a "Task."
Everything kicks off on the New Task screen. You’ve got two easy ways to get your video into the system. You can drag and drop your file right into the browser—it can even handle big ones up to 5GB. Or, for a quicker start, just paste a URL from places like YouTube, X (Twitter), TikTok, or Instagram, and the app will pull it in for you.
Pro Tip: When you're on the New Task screen, hit the
Fkey on your keyboard. It pops open the file picker instantly. It's a tiny shortcut, but it saves a few clicks every time.
Kicking Off Your Project
Once your video is in, it's time to tell the AI exactly what you need it to do. This part is crucial for getting the results you want.
First, you’ll set your languages.
- Source Language: This is what's being spoken in your video, so you'll choose Indonesian.
- Target Language: This is what you want to end up with, so pick English.
Next, you'll choose the service you need. Each one does something a little different.
- Transcription: This just gives you captions in the original language (Indonesian). It’s a great starting point if you want a clean transcript to work from.
- Translation: This is the main event—it takes the Indonesian audio and creates English subtitles. Perfect for audiences who prefer to read along.
- Dubbing: This goes one step further and creates a brand-new AI audio track in English, giving you a full voiceover for your video.
Your choice here really just depends on your goal. If you want people reading along, go with Translation for subtitles. If you want them to listen in English, Dubbing is your best bet.
As this simple flow shows, a great AI translation starts long before you click that final "translate" button. It all begins with getting your source material right.
How The AI "Thinks" About Translation
It’s interesting to see how AI often mimics the same methods human translators use. One study on English-Indonesian translations on social media found that a literal, word-for-word translation was the most common approach, happening 41% of the time. But it was followed by adaptation (18%) and calque (15%)—techniques used to tweak phrasing to sound more natural and culturally appropriate.
For us creators, knowing this helps us guide the AI to give us a better final product. For more complex projects, some people even use smart routing of AI models to automatically pick the best engine for the job based on the specific text, which is a pretty cool way to get top-tier results.
This initial setup is where you set your project up for success. By clearly telling the AI your languages and what service you need, you’re giving it the instructions to create a high-quality first draft. To see this all in action, you can check out our guide on how to translate videos, which breaks down the entire process.
Refining Your Translation In The Studio Workspace

The first AI pass on your language translation from Indonesian to English gets you most of the way there, but the real secret sauce is adding your own expertise. That’s where the TranslateMom Studio Workspace comes in—it’s where you apply the human touch that turns a decent translation into a fantastic one.
The editor itself is designed for speed and precision. In the center, you’ve got a special video player showing a perfect preview of how your final subtitles will look. To the side, you'll see a scrolling list of every subtitle line, ready for you to edit.
The real game-changer here is the Split View. One click and you can see the original Indonesian text right beside your English translation. This makes spotting subtle mistakes and perfecting the phrasing so much faster.
Making Precise Timing Adjustments
We all know timing is everything. Subtitles that show up too early or hang around too long just feel wrong. The Studio puts a visual audio waveform right inside the subtitle editor, which makes getting the timing perfect a breeze.
You can actually see the highs and lows in the speaker's voice. This lets you visually drag the start and end points of each caption to line them up perfectly with spoken words. It’s way more intuitive than just staring at timecodes.
Fine-Tuning The Look and Feel
Getting the words right is one thing, but how your captions look is just as important. The Studio Tabs give you full control over the visual style.
- Style Tab: Jump in here to switch fonts, play with the size, and pick your colors. You can also add an outline, shadow, or a background to make sure your text stands out.
- Brand Tab: Pop your logo or watermark right onto the video. You can easily resize it and drag it to any corner to keep your branding consistent.
- Karaoke Effects: You can create those karaoke-style captions where words light up as they’re spoken. In the Style tab, select a preset or configure the animation yourself to make your videos extra dynamic. The app smartly syncs word timings for you.
This level of control means your final video will look polished and match your brand’s vibe. If you want to go deeper into best practices, check out our guide on subtitling and translation in our detailed guide.
Getting translations right is crucial, especially when you're trying to reach diverse communities. Take California's Language Access Plan—it requires translations to consider local dialects and cultural nuances for its LEP (Limited English Proficient) residents, including its growing Indonesian population. This shows just how important it is to have tools that let you fine-tune every detail.
With these editing tools at your fingertips, you can go way beyond a basic translation. You’re ready to create content that’s not just accurate, but genuinely engaging and professional for your English-speaking audience.
Getting Your Video Out There for Maximum Impact
You've put in the work, polished your Indonesian to English translation, and now it's time for the final, crucial step: getting your content in front of your audience. How you export your video makes all the difference in how people see and interact with it.
Basically, you have two paths you can take: either burn the subtitles directly into the video or keep them as a separate file.
Your choice here really depends on where you plan to post the video.
The "Burn-in" Method for Social Feeds
Think about platforms like Instagram, TikTok, or X (what we used to call Twitter). Videos often autoplay on mute as you scroll. If your subtitles aren't a permanent part of the video, your message is completely lost.
That’s where "burning in" your subtitles is a game-changer. It means the text is literally "baked" into the video file itself. No toggling on or off—it's just there, guaranteeing everyone catches what's being said, sound on or not.
In a tool like TranslateMom, you'd use the Burn-in (Export Video) option. The platform does the heavy lifting, rendering a brand new video file with your styled subtitles and maybe even your logo. The result is a single, ready-to-upload file that’s perfect for the fast-paced world of social media.
Separate Subtitle Files for Flexibility and Accessibility
On the other hand, for platforms like YouTube or professional video projects, a separate subtitle file is the way to go. This approach gives viewers control, letting them turn captions on or off as they please. It's a huge win for accessibility.
You've got a few file formats to choose from, but these are the main ones you'll encounter:
- SRT (SubRip Text): This is the industry workhorse. It’s a super simple text file that contains your subtitles numbered in sequence, each with a precise start and end timecode. It's universally supported by YouTube, Vimeo, and pretty much every video player out there. When in doubt, start with SRT.
- VTT (WebVTT): Think of VTT as the modern successor to SRT, built for the web. It does everything SRT can do but adds support for extra styling like bold and italics, and even lets you control the text position on the screen.
- ASS (Advanced SubStation Alpha): If you've gone all out with creative captions—like cool karaoke-style effects or custom animations—the ASS format is your best friend. It preserves all that fancy formatting so it shows up perfectly in compatible players like VLC.
Giving viewers this choice isn't just a nice-to-have; it's essential for reaching a wider audience, from people with hearing impairments to someone watching your video on a noisy train.
Making content accessible isn't just good practice; it's becoming a standard. In California, for instance, the state's Language and Communication Access Plan is working to reach 91% of residents who have limited English proficiency. For creators, this is a huge opportunity. By providing accurate subtitles, you can connect with diverse communities, including the vibrant Indonesian diaspora. You can read more about California's commitment to language access in their official plan.
So, take a moment to think about your audience and platform. Are you aiming for max visibility on a social feed? Burn those captions in. Are you uploading to YouTube and want to prioritize accessibility? Go with a separate SRT file.
This final decision is what turns your translated project into a polished, professional piece of media that’s truly ready for a global audience.
Common Questions Answered
When you're diving into an Indonesian to English translation project, a few common questions always seem to pop up, especially if you're working with video. Here are some quick, no-nonsense answers based on what I see creators ask all the time.
Can I Just Translate a Video Straight From a YouTube Link?
Yep, you absolutely can. Forget the old-school hassle of downloading a video just to re-upload it somewhere else. Modern tools are built to skip all that.
With a tool like TranslateMom, for instance, you just head to the New Task screen and drop in a URL from YouTube, X (formerly Twitter), TikTok, or Instagram. The app grabs the video for you, which saves a ton of time and bandwidth right from the get-go.
What's the Best Subtitle Format to Use?
This one’s easy: the best format is whatever works for the platform you’re posting on. There's no single "best" one, but there are definitely right choices for the job.
- SRT (SubRip Text): This is your go-to for universal compatibility. If you're posting on YouTube or Vimeo, an SRT file lets viewers turn captions on or off themselves. It's the standard for a reason.
- Burn-in (Export Video): Think Instagram or TikTok, where videos often start playing silently. You’ll want to "burn" the subtitles right into the video file. This way, your message gets across whether the sound is on or not.
- ASS (Advanced SubStation Alpha): Pick this one only if you're getting fancy with your subtitle styling. If you’ve created those cool karaoke-style animations you see on social media shorts, ASS will make sure they show up correctly.
How Do I Make Sure the Translation Isn't Culturally Awkward?
This is where you, the human, are irreplaceable. AI gives you a fantastic head start with a translation that's usually very accurate, but it can miss the subtle stuff—the slang, the idioms, the cultural inside jokes.
My advice is to use a hybrid approach. In TranslateMom, the Studio Editor has a Split View feature that is perfect for this. It puts the original Indonesian right next to the English translation. You can easily scan through and tweak any phrases that feel a bit too literal or just don't land right for an English-speaking audience. It's all about keeping the original vibe intact.
A word-for-word translation is rarely the best translation. Taking a moment to refine the phrasing for cultural context is what turns a good translation into a great one. It’s how you make sure your content really connects.
TranslateMom Keyboard Shortcuts For Power Users
Want to fly through your editing workflow? Mastering a few keyboard shortcuts is the fastest way to get there. Here's a handy little cheat sheet for the TranslateMom Studio.
This table gives you a quick reference for the essential keyboard shortcuts that'll help you speed up your translation and editing process.
| Key | Action |
|---|---|
| N | Start a New Task from anywhere in the app. |
| F | Open the File picker instantly on the New Task page. |
| Space | Play or Pause the video player. |
| + / - | Quickly increase or decrease the font size of your subtitles. |
| [ / ] | Move the currently selected subtitle row up or down in the list. |
Keep these handy, and you'll be amazed at how much faster you can get your projects done.
Ready to get your Indonesian videos in front of a global audience? With TranslateMom, you can get subtitles, translations, and even dubbing done in minutes, not days. Start your first project for free today and see just how simple it is to break through language barriers.