Getting your hands on a YouTube transcript is pretty straightforward. You can always use YouTube's built-in "Show transcript" feature, then just copy and paste the text. It's free, which is great, but it can be a real hassle. You often end up with messy formatting and timestamps you have to clean up manually.
For a much smoother workflow, automated tools can pull a clean transcript for you in seconds.
Why YouTube Transcripts Are a Content Goldmine

Have you ever stopped to think about why smart creators are so focused on turning their video's audio into text? It’s because a simple transcript youtube download is a secret weapon. It unlocks a ton of value that's otherwise trapped inside the video file. Think of it less as a script and more as a powerful asset that can supercharge your whole content strategy.
Boosting Discoverability and SEO
Here’s the thing: search engines like Google are incredible at reading text, but they can’t actually "watch" your video to figure out what it's about. When you post a transcript with your video, you’re giving them a text-based roadmap they can easily follow and index.
Suddenly, your video content becomes visible for all sorts of relevant keywords, driving more organic traffic right to your channel or website. Every single word you speak turns into another chance to be discovered.
Enhancing Accessibility for All Viewers
A transcript is fundamental to making your content accessible. It’s an absolute necessity for viewers who are deaf or hard of hearing, allowing them to engage with your message fully. But the benefits go way beyond that.
Transcripts help out:
- People in noisy places who can't turn the sound on.
- Non-native speakers who find reading easier than listening to fast-paced speech.
- Anyone watching on mute, which is how a lot of us scroll through social media feeds anyway.
By including a transcript, you’re making sure your content works for everyone, no matter their situation.
"A transcript isn't just a convenience; it's a bridge that connects your message to a broader, more diverse audience. It ensures your content is understood by anyone, anywhere, at any time."
Unlocking Content Repurposing
This is where the magic really happens. The ability to download a YouTube transcript is a complete game-changer for repurposing your content. That hour-long interview or 10-minute tutorial is packed with material you can spin into new formats. For example, it’s much easier to take clips from a YouTube video when you can quickly search the transcript to find the exact moment you need.
With that text file, you can effortlessly create:
- In-depth blog posts and articles.
- Catchy social media captions and posts.
- Email newsletters full of key insights.
- Infographics that visualise the data from your video.
This approach saves an incredible amount of time and keeps your core message consistent everywhere you post.
The Manual Copy and Paste Method
Sometimes, you just need a quick, no-frills way to grab the text from a video. For that, YouTube’s own built-in transcript feature is your go-to. It’s the most direct route for what you could call a transcript youtube download, though it’s really more of a manual copy-and-paste job.
This method costs you nothing but a bit of time, making it a decent option for really short clips.
Finding the Transcript Panel
First, you need to find the transcript. Head over to the YouTube video you’re interested in. Just below the video player and the title, you’ll see the description box. Click on the "...more" button to see the whole thing.
If the creator has transcripts available, a button labelled "Show transcript" will appear. Give that a click.
A new panel will pop up, usually on the right side of the video. It displays all the spoken text, neatly broken down line-by-line and matched with timestamps.
The Copy and Paste Process
With the transcript panel open, your next move is to get the text ready. Look for a small three-dot menu at the top of that panel. Clicking it gives you the option to "Toggle timestamps." My advice? Turn them off. It gives you a much cleaner block of text, perfect if you just need the raw dialogue without the timing data.
From there, it’s a simple highlight, copy, and paste. Drag your cursor to select all the text, right-click and copy (or use Ctrl+C / Cmd+C), and then drop it into whatever you're using—Google Docs, Microsoft Word, or even just a simple text editor.
The manual method is a good starting point—it shows you what’s possible right on the platform. But once you’re dealing with anything longer than a two-minute clip, its limitations become painfully obvious. It really highlights why more efficient, specialized tools are a lifesaver.
This process seems simple enough, but its practicality drops off a cliff with longer videos. In Canada, a whopping 78% of online adults watch YouTube every month. With so many younger viewers watching videos on mute, having accessible text is more important than ever. Still, YouTube doesn't offer a direct download button, forcing this tedious copy-paste routine that can eat up hours for longer content. You can learn more about these viewing habits and the need for better transcript solutions over at Translate.Mom.
The biggest headache is the time it takes and the formatting mess it creates. You lose all the precise timing information, and everything often gets mushed into one giant wall of text that needs a ton of cleanup. While it's free, this method is an exercise in patience that most creators and professionals just don't have time for.
Using Automated Tools for Instant Downloads
Let's be real: manually copying and pasting a transcript is fine for a 30-second clip, but it's a non-starter for anything longer. When you need a reliable transcript youtube download for a podcast, a lecture, or a lengthy tutorial, you need to bring in the automated tools. These range from simple browser extensions to powerful web apps, and they all turn a mind-numbing task into a quick click.
The biggest win here is pure efficiency. Instead of fighting with weird formatting and losing all the timestamp data, these tools do the heavy lifting for you. You just drop in a YouTube URL, and out comes a clean, perfectly timed transcript. It’s not just about saving time; it's about getting a professional, usable file you can immediately put to work.
What to Look for in a Transcript Tool
Not all downloaders are built the same, so it pays to be a bit picky. When you're choosing a tool, think about what you actually need to do with the transcript.
Here are the non-negotiables I always look for:
- Direct URL Import: Pasting a link from YouTube is the bare minimum. In a tool like TranslateMom, this is the Link Import feature, which also handles platforms like TikTok or X.
- Multiple File Formats: A good tool should offer
.TXT(for plain text),.SRT(the standard for subtitles), and.VTT(a more modern format). - Timestamp Preservation: If you’re making captions or need to reference specific moments, accurate timestamps are everything.
- Editing Capabilities: No automated transcript is perfect. The best tools give you an editor to clean up any mistakes before you export.
YouTube’s lack of a native download button has created a huge demand for these kinds of solutions, especially here in Canada. From my experience, tools that can pull a transcript straight from a URL are always the most popular. They're fast, accurate, and give you the file in whatever format you need.
A powerful automated tool doesn't just download text; it gives you a clean, structured, and ready-to-use asset. It’s the difference between being handed a pile of lumber and being given a pre-built frame for your house.
To give you a clearer picture, I've put together a quick comparison of the main methods people use.
YouTube Transcript Download Method Comparison
This table breaks down the pros and cons of the most common ways to get a transcript from a YouTube video.
| Method | Speed | Format Options | Best For | Timestamp Accuracy |
|---|---|---|---|---|
| YouTube Native Interface | Fast | TXT only (no timestamps) | Quick, informal text grabs | Poor (removes them) |
| Browser Extensions | Very Fast | Limited (often TXT, SRT) | Casual users, one-off downloads | Good |
| Online Downloader Tools | Very Fast | Good (TXT, SRT, VTT common) | Most users, requires reliable formats | Excellent |
| Command-Line (CLI) | Fastest (for pros) | Excellent (many formats) | Developers, bulk processing | Excellent |
As you can see, for most people, a dedicated online tool offers the best balance of speed, features, and ease of use.
Professional-Grade Platforms for Advanced Needs
If you're a creator, marketer, or researcher who needs more than just a raw text file, it’s time to look at professional platforms. A tool like TranslateMom isn't just an extractor; it's a full-blown studio.
These advanced tools let you fine-tune timing, correct text on the fly, and even translate your subtitles into multiple languages. They’re built for people who need a flawless final product for accessibility, localizing content, or repurposing video into other formats. If that sounds like you, checking out the best transcription tool of 2025 will show you what’s possible with a high-end solution.
How to Download and Refine Transcripts with TranslateMom
While quick downloaders can grab the raw text from a video, they often leave you with a messy file that needs a lot of cleanup. If you’re after a truly professional transcript youtube download, you need a tool that handles the entire process—from grabbing the video to polishing the final text. This is where a dedicated platform like TranslateMom really makes a difference, giving you a full studio environment to perfect your content.
The whole idea is to move beyond a simple one-off extraction and into a managed workflow. Every video you bring in becomes a "Task," which keeps everything organized as you ingest, process, and edit.
From YouTube URL to Editable Text
Getting started is as simple as it gets. From the New Task screen, you can drag and drop a video file, but for YouTube content, the Link Import feature is way more convenient. Just paste in the video’s URL, and the app will pull it in for you.
Once your video is loaded, you'll need to set up the project:
- Source Language: Just tell the tool what language is spoken in the video.
- Target Language: If you only need a transcript, this will be the same as the source.
- Choose a Service: Pick Transcription to generate captions in the original language.
This initial setup literally takes seconds and drops you right into the editing phase, where all the powerful features are.
The diagram below gives you a quick visual of how a tool takes a simple video link and turns it into a transcript.
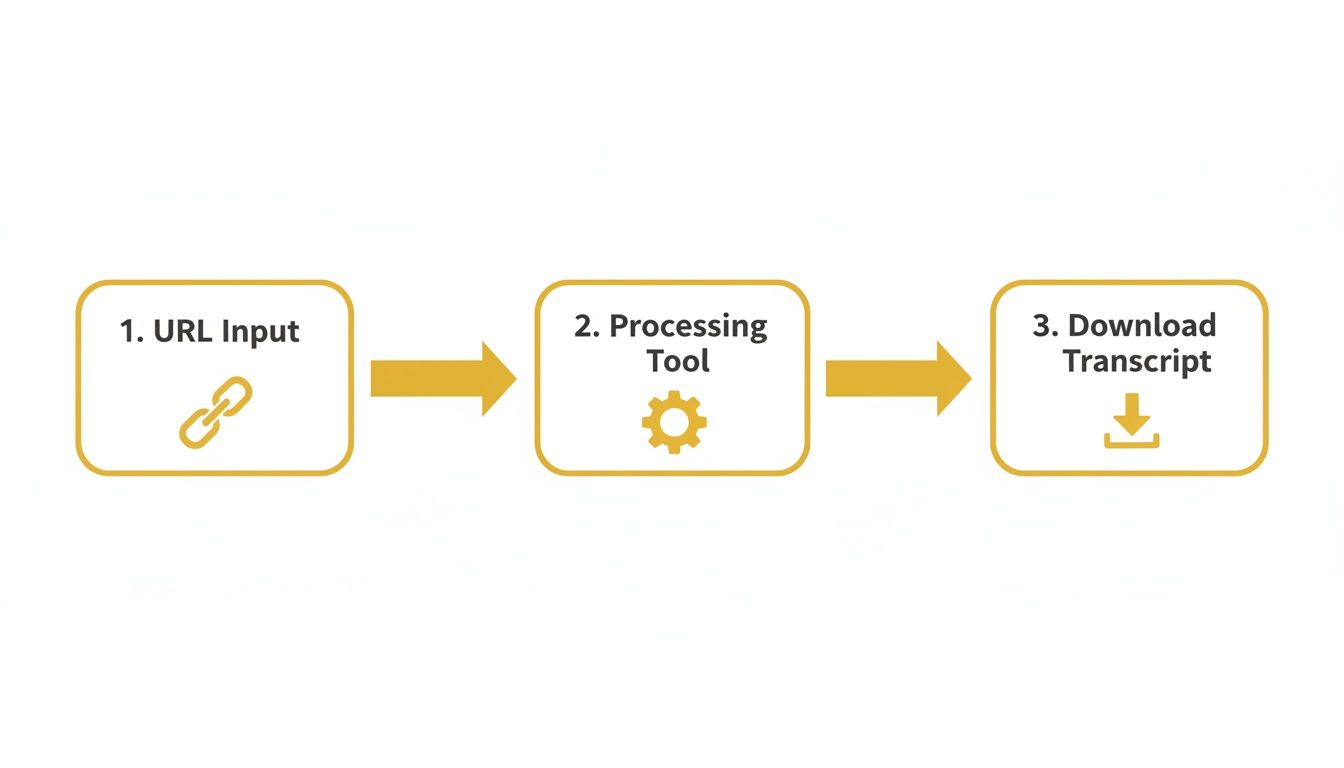
This is the exact workflow that TranslateMom streamlines, turning a complex process into a few simple clicks.
Fine-Tuning in the Studio Workspace
After a moment of processing, you'll land in the Studio Workspace. This is an editor built for precision, and it's what separates a basic downloader from a professional tool. The interface is split into a few key zones designed to make your workflow efficient, letting you see your changes in real-time.
The Subtitle Editor is where you'll spend most of your time. It displays every line of your transcript, all ready for you to tweak. When you click on a line to edit the text, the video player automatically pauses, which is a nice touch that lets you focus without getting distracted.
Even better, you get a visual Waveform of the audio. This feature is a total game-changer for getting the timing just right. You can actually see the spoken words and the silent gaps, allowing you to drag the start and end points of each caption to line them up perfectly with the audio.
This level of control is what makes the difference. An automated transcript might be 98% accurate, but that last 2%—weird timings, misspelled names, or wonky punctuation—is what can make the final result feel amateur. The Studio gives you the power to nail those small but vital details.
Advanced Editing and Exporting
Beyond just correcting text, the Studio lets you get creative through its sidebar tabs. In the Style tab, for instance, you can change the font, color, and background of your subtitles. This is perfect if you’re planning to burn the captions directly into the video. You can even apply karaoke-style animations where words highlight as they are spoken.
Once your transcript is polished and ready to go, you have two main export options:
- Download Subtitles: This is what most people will use for a transcript download. You can export your work as an
.SRTor.VTTfile, which includes all of your precise timing adjustments. - Burn-in (Export Video): If you went ahead and styled your captions, you can render a completely new video file with the text permanently "baked in," ready to share on social media.
This complete process ensures your final transcript isn’t just a wall of text, but a perfectly timed, accurate, and professional asset. If you happen to be starting with a plain text file and need to add timing information, you can check out a helpful guide on converting TXT files to the SRT format to get them ready for any video platform.
Taking Your Transcript Global with Translation and Dubbing
Getting a clean transcript is a great start, but it’s really just the beginning. If you want to blow past your current audience and truly maximize your video's reach, you need to think beyond its original language. This is where a simple transcript youtube download becomes a powerful tool for global communication, especially when you use platforms like TranslateMom to close the language gap.
By moving beyond a basic transcript, you unlock new audiences and make your content accessible on a worldwide scale. The best part? The process is a lot more straightforward than you might think.

From a Single Language to Dozens
Once you've pulled your YouTube video into a tool like TranslateMom, the real magic starts. Instead of just stopping at "Transcription," you can select Translation. That one click opens up the ability to generate subtitles in over 100 different languages.
Here's a quick look at how it works:
- Pick Your Target Language: Just find the language you need in the dropdown menu.
- Generate AI Subtitles: The platform’s AI gets to work, processing your original text and creating a brand new set of timed subtitles in the language you chose.
- Polish it in the Studio: From there, you can jump into the Studio Workspace to give the translation a final once-over. The Split View is a lifesaver here—it shows your original text right next to the new translation, making it dead simple to compare and tweak things.
A process that used to take days and a professional translator can now be knocked out in just a few minutes.
Creating a New Voice with AI Dubbing
Want to create an even more immersive experience? Take that translated transcript one step further and use it to generate a whole new audio track. This is called dubbing, and modern AI has made it incredibly accessible for any creator.
Inside TranslateMom, you’d simply choose the Dubbing service. The platform uses your translated text to create a natural-sounding voiceover in the target language. It’s an amazing way to make your content feel like it was made for viewers in different countries, which can seriously boost engagement and understanding.
When you translate and dub your videos, you're doing more than just adding subtitles—you're crafting a localized experience. You’re telling a global audience you cared enough to make content just for them, and that builds a much stronger connection.
This isn’t just a nice-to-have anymore; it's becoming critical. In 2024, Canadian video marketing budgets have jumped by 28%, with a huge focus on using transcripts for better SEO. Search engines index the text, which can lift a channel's visibility by as much as 40%. On top of that, Canadian creators are seeing a 25% higher engagement rate on average after adding localized subtitles.
Dual Language Mode for Learning
If you have language learners in your audience, you can also flip on the Dual Language Mode. This is a slick feature that stacks the subtitles, showing both the original and translated languages on screen at the same time. It’s a fantastic educational tool that helps viewers make direct connections between words and phrases.
At the end of the day, that downloaded transcript is your foundation. With the right tools, you can build on it to create content that speaks to anyone, anywhere in the world. To see this workflow in action, you might want to check out our guide on how to translate videos effectively.
Your Top YouTube Transcript Questions, Answered
Once you start pulling transcripts from YouTube videos, you’ll probably run into a few recurring questions. It’s totally normal. Things like legal use and file types can feel a bit confusing at first, so let's clear them up.
Getting these details right from the start means you can use the text you download efficiently, ethically, and with total confidence.
Is It Legal to Download a Transcript from Someone Else's YouTube Video?
This is the big one, and the answer is nuanced. For personal use—like your own research, private study, or just to better understand the video—you’re generally in the clear. In Canada and many other places, this falls under "fair dealing" or "fair use." You're just consuming the content in a different way, not sharing it.
The situation changes the second you want to republish that text. The creator's spoken words are their intellectual property, so copying them word-for-word on your blog or in a product without permission can land you in hot water with copyright law.
My rule of thumb is simple: Always credit the original creator. If you plan to use their words for anything commercial, reach out and ask for permission first. It’s the respectful thing to do and keeps you on the right side of the law.
What Is the Difference Between SRT and TXT Files?
Not all transcript files are built the same. The format you need really depends on what you're trying to do.
- TXT (.txt): Think of this as the raw text. It’s just the words, completely stripped of any timing data or special formatting. A TXT file is your best friend if you want to turn a video into an article, create show notes, or just analyse the script.
- SRT (.srt): This is a SubRip Subtitle file, and it’s much more structured. It breaks the text into timed "cues" or captions, each with a precise start and end time (like
00:00:10,500 --> 00:00:12,000). You absolutely need this format if you're adding subtitles back into a video editor or uploading them to a platform like YouTube.
For instance, with a tool like TranslateMom, you can export in both formats. You’d grab the SRT file to create perfectly synced captions for a video, and then download the TXT to quickly draft a blog post from the same content.
How Accurate Are Automated Transcription Tools?
Automated transcription has come a long way. The best tools can now hit over 98% accuracy on videos with clear audio, which is fantastic. But "clear audio" is the key phrase here.
Accuracy can drop pretty quickly if you’re dealing with:
- Loud background music or noise
- People talking over each other
- Thick accents or really fast talkers
- Niche industry jargon
This is exactly why having access to a professional editing tool is a game-changer. A platform that gives you a Studio Workspace, where you can see the text alongside a visual audio waveform, lets you make those crucial final tweaks. You can easily fix any errors and adjust the timing to get a truly flawless result before you export.
Ready to create perfectly polished, globally accessible video content? TranslateMom offers a complete studio for transcribing, translating, and dubbing your videos with professional precision. Try it today at https://translate.mom.