Translating Spanish audio into English isn't just about switching out words. To really connect with your audience, you have to capture the original feel—the emotion, the specific cultural nuances, and the speaker's true intent. It's a craft that makes all the difference, whether you're creating social media content or preparing audio for a legal case.
Why Getting Spanish to English Audio Translation Right Matters
In a world this connected, clear and accurate audio translation isn't just for big corporations anymore. It's become a must-have for all kinds of creators and professionals.
Think about it: a podcaster in Madrid can now build a huge following in Toronto, but only if the English version sounds natural and still feels like them. Botch the translation, and you don’t just get awkward phrasing—you get misunderstandings, tuned-out listeners, and a serious hit to your credibility.
And this goes way beyond entertainment. It's a matter of basic access and justice.
Take California, for example. The state is incredibly diverse, and the demand for Spanish-to-English services, especially in the legal system, is massive. In the 2021–22 fiscal year alone, California's courts handled 630,965 interpretations, and a whopping 89% of them were in Spanish. That number really drives home how critical accurate translation is for making sure everyone gets a fair shot. You can dig into more of the data on these language access metrics to see the full picture.
The Old Way vs. The New Way
Not too long ago, translating and dubbing audio was a massive headache. It was slow, expensive, and really only an option for big-budget movies. You had to hire voice actors, book pricey studio time, and then manually sync everything up. For most people and small businesses, it was completely out of reach.
But now, technology has totally flipped the script. Modern, AI-powered tools have opened up a new workflow that puts professional-grade results in everyone's hands. What used to take weeks and a huge budget is now a simple, streamlined process:
- Automated Transcription: First, AI listens to the original Spanish audio and turns it into text.
- Instant Translation: Next, that Spanish text is translated into English in a matter of seconds.
- AI Dubbing: Finally, a synthetic voice can generate a brand-new English audio track, often mimicking the original speaker's tone.
The real game-changer here is efficiency and access. A project that once demanded a whole team of specialists can now be handled by one person with a web browser. This empowers anyone to break through language barriers without having to sacrifice quality, making global communication a real possibility for every creator out there.
Choosing Your Audio Translation Workflow
Before you dive into translating Spanish audio to English, it's a good idea to think through your plan. A modern translation project isn't just a one-click affair; it’s a series of distinct stages. Figuring out this workflow from the start helps you pick the right tools for the job, so you don't end up wasting time or money.
The whole process really boils down to four key phases: getting your audio in, processing it, editing the output, and finally, getting it back out in the format you need. Each step has its own quirks that can impact the final quality. This flow chart gives you a quick visual on how much simpler things are with today's AI tools compared to the old-school manual methods.
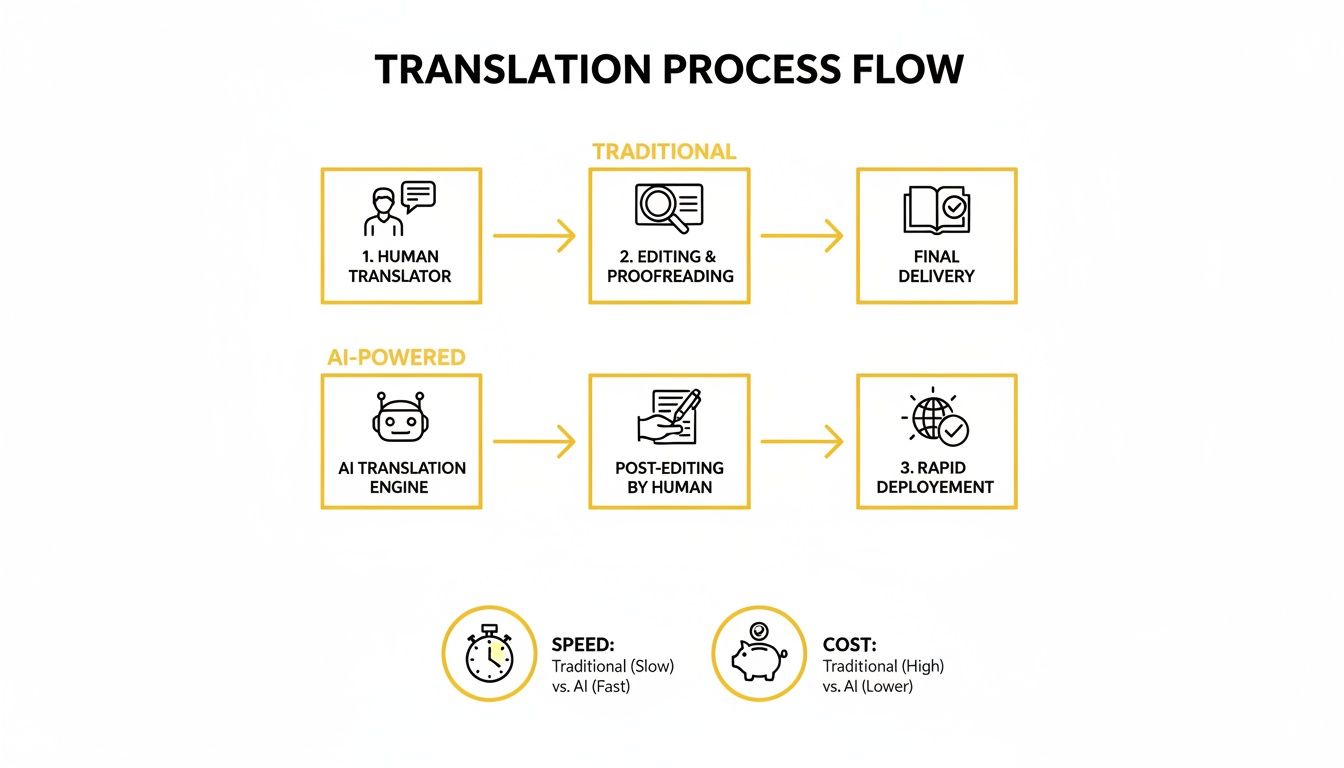
As you can see, AI-powered systems take a lot of the heavy lifting out of those first few steps, automating work that used to take hours of manual effort.
Ingestion and Processing Choices
First things first, you need to get your media into the system. With a tool like TranslateMom, this starts at the New Task screen. You can either drag and drop a video file right into your browser or just paste a link from a platform like YouTube. This is where you set the entire direction for your project.
Once your file is loaded up, you’ll be prompted to choose one of three main services. Which one you pick really hangs on what you're trying to achieve with your final video.
- Transcription: This service just converts the original Spanish audio into a text script, complete with timestamps. It’s the essential first step for any translation project and is perfect if all you need is a written record or if you plan on doing the translation yourself. Before any translation can happen, the video transcription process is what turns the spoken words into text.
- Translation: This option automatically transcribes the Spanish audio and then translates that text into English subtitles. It's a fantastic choice for social media content, where tons of people watch videos with the sound off.
- Dubbing: This is the full package. Dubbing creates a brand-new, AI-generated audio track in English that syncs up with your video, replacing the original Spanish voice. This is your go-to for creating a really immersive experience, like for documentaries, e-learning courses, or corporate training videos. You can get a deeper look into how this works in our guide to English translation with sound.
Comparing Your Audio Translation Options
To help you decide which path is right for your Spanish to English project, here's a quick comparison of the services.
| Service Type | Primary Output | Best For | Key Feature |
|---|---|---|---|
| Transcription | Timed Text Script (Spanish) | Creating a written record, manual translations, or basic accessibility. | Provides the foundational text from the original audio. |
| Translation | English Subtitles (SRT/VTT) | Social media, online videos, and content for viewers who prefer captions. | Makes video content understandable without audio. |
| AI Dubbing | New English Audio Track | Documentaries, training videos, and creating a seamless, localized experience. | Replaces the original voice for maximum audience immersion. |
Ultimately, the choice depends on how you want your audience to experience your content.
Defining Your Project Scope
Making the call between these options is probably the most important decision in this process. If your only goal is to add captions for accessibility in the original Spanish, then a simple transcription is all you need. If you're trying to grab the attention of an English-speaking audience on social media, translation for subtitles is a super effective way to go.
But if you’re aiming for the most professional and polished result, AI dubbing is the clear winner. It gives your audience a fully localized experience, letting them connect with your content naturally without the distraction of reading. This makes it the best choice for high-value video where engagement is everything.
Alright, let's get your first Spanish-to-English audio translation project off the ground. Now that you've got the basics down, it's time to dive in and see how it all works in practice. Modern tools are built to feel intuitive, so you can stop wrestling with the tech and just focus on getting your message across.
Everything kicks off from the New Task screen in TranslateMom. Think of this as your starting line. You've got a couple of simple ways to get your Spanish audio or video file into the system.
- File Upload: The easiest way is to just grab the media file from your computer and drop it right into the browser. The platform is built to handle big files (up to 5GB), so don't worry about compressing your beautiful, high-quality video beforehand.
- Link Import: If your content is already living online somewhere like YouTube, TikTok, or Instagram, just copy the URL and paste it in. The app takes care of the rest. For an even smoother workflow, you can learn how to download a YouTube transcript and its video in just a few clicks.
Here’s a little pro-tip for desktop users: on the "New Task" screen, just hit the F key. It’ll pop open your computer's file picker instantly, saving you a bit of time.
Getting Your Project Settings Just Right
Once your file is uploaded, the real magic begins. You'll be prompted to tell the software what you need it to do. Nailing these settings from the start is the key to getting an accurate result without a lot of extra work later.
First things first, you have to define the languages. Set the Source Language to Spanish—this tells the AI what language is being spoken in your original file. Then, set the Target Language to English, which is what you want your final audio or subtitles to be.
With the languages set, you just need to choose what you want to create. Since our goal here is a brand-new English audio track, you’ll select the Dubbing option. This single click tells the system to run the entire sequence: transcribe the Spanish dialogue, translate the text into English, and then generate a new AI voiceover.
My Two Cents: This initial setup is hands-down the most important part of the whole process. If you get the source and target languages right and select "Dubbing," you're setting the AI up for success. It ensures you get a high-quality English audio track that’s ready for you to fine-tune.
With that, you're all set to head into the main editing workspace, what we call the Studio. This is where you'll bring everything together—the video player, the subtitle editor, and all the styling options are in one place, giving you total control.
How to Edit and Refine Your Translation
Let’s be honest, AI translation gives you a massive head start, but it's the human touch that really makes it shine. Once the machine does its thing, you’ll jump into the TranslateMom Studio—this is your workspace for getting everything just right. It’s where you polish the raw output, making sure your Spanish to English audio translation is accurate, culturally on point, and perfectly timed.
This final review is what connects your content with your audience. Think about it: in a place like California, where nearly 11 million people speak Spanish, a clunky translation can completely miss the mark. Getting those nuances right is essential for businesses, schools, and public services trying to communicate effectively. If you're curious, you can check out the top languages spoken in California to see just how important this is.
Mastering the Dual-Language Editor
The real magic happens in the editor. The TranslateMom Studio Workspace is divided into zones for the player, the subtitle editor, and the styling tabs. The most powerful feature here for translation is the Split View. This lets you see the original Spanish text and the AI-generated English translation side-by-side for every single line.
This side-by-side view is your secret weapon for catching those tiny mistakes. You can spot idioms, cultural references, or conversational quirks that an automated system might overlook. It’s how you make sure the English version has the same feel as the original.
For instance, a literal Spanish translation might be grammatically correct but sound totally unnatural in English. The dual-language view helps you catch these moments and rephrase them so they flow naturally. You can click on any text line to edit it instantly.
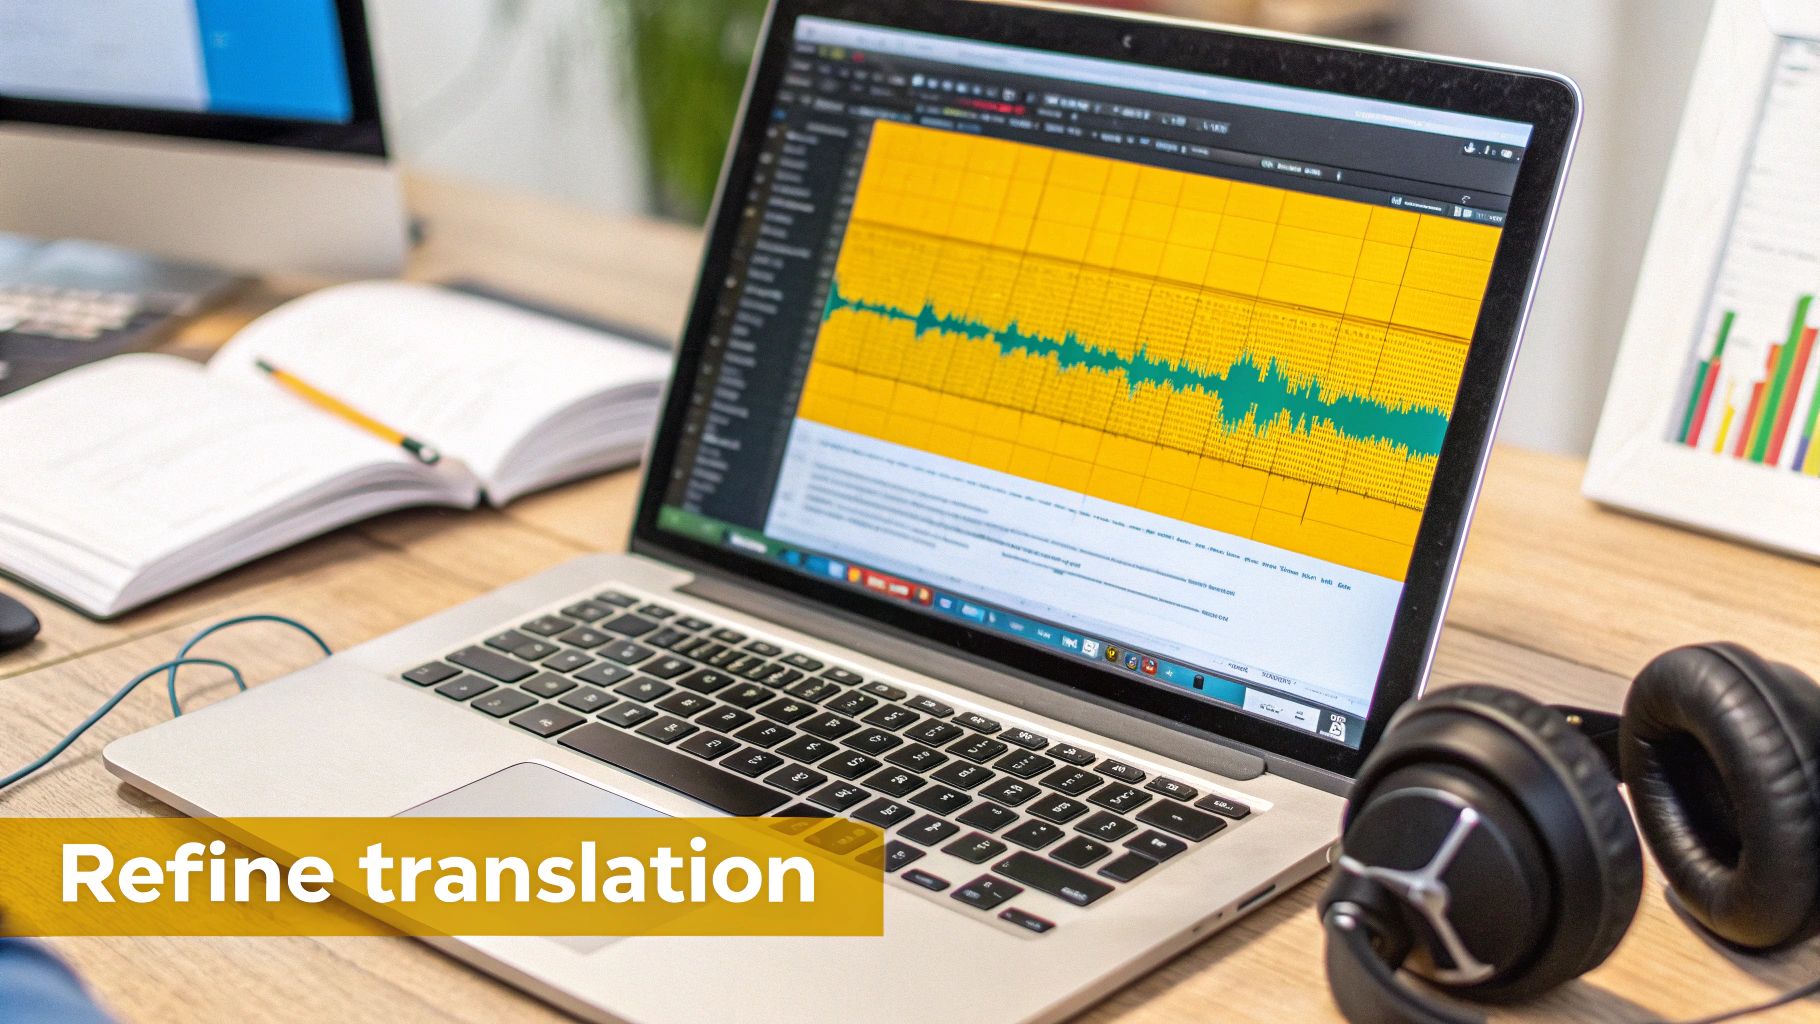
Synchronizing Audio with Visuals
Great translation is more than just words; timing is everything. Subtitles that pop up too early or hang around too long are distracting, and dubbed audio that doesn't match the speaker's mouth is just plain weird.
This is where the visual audio waveform comes in handy. It’s basically a picture of your audio, showing you exactly where the talking starts, stops, and where the silent gaps are.
Inside TranslateMom’s editor, the waveform lets you:
- Drag Start/End Points: Simply click and drag the edges of the waveform selection to line up each subtitle perfectly with the dialogue.
- Eliminate "Dead Air": You can tighten up the captions to appear the instant someone speaks and vanish the moment they stop.
- Sync Dubbed Audio: For dubbing, this ensures your new English audio track follows the same rhythm and pauses as the original speaker.
One thing that can throw off your timing is poor audio quality. If your original Spanish audio is full of background noise, it can make it tough for the AI to get the transcription and timing right. I’d recommend checking out our guide on effective background noise removal from video before you even start translating.
By using both the dual-language editor for word-perfect accuracy and the waveform for timing, you can take a good automated translation and make it truly professional. This hands-on step is what will create a seamless translation spanish to english audio experience for your audience.
Exporting and Sharing Your Translated Content
You’ve done the hard work of refining your project, and now it’s time for the final step: getting your translated content out into the world. How you do this really comes down to where your project is headed.
The choice you'll make is usually between creating a finished video file with the text "burned in," or simply downloading the raw subtitle data. Each has its own distinct purpose, and picking the right one is key.

When your translation and dubbing jobs are done, you'll see them pop up in your task list, just like in the screenshot above. This dashboard is your launchpad, where you'll grab your finished files once the system has worked its magic.
Burn-In Video for Social Media
If you're creating content for platforms like TikTok, Instagram, or X (formerly Twitter), the "Burn-in" option is almost always the way to go. This process permanently embeds your English subtitles right onto the video, giving you a brand new MP4 file that's ready to upload.
This is a game-changer for social feeds. It guarantees every single viewer sees your captions, no matter their device settings. Since so many people watch videos with the sound off, it’s the best way to make sure your message doesn't get lost.
When you hit Export Video in a tool like TranslateMom, all the heavy lifting happens on the server. You don't need a beast of a computer or fancy editing software—the platform handles the rendering and spits out a polished video file for you.
Download Subtitle Files for Flexibility
Sometimes, you need more control. That's where downloading a separate subtitle file, like an SRT or VTT, comes in handy. It offers maximum flexibility.
This route is perfect for a few key scenarios:
- YouTube: Uploading an SRT file lets viewers turn captions on or off themselves. It's great for accessibility and just a better user experience all around.
- Professional Editing: If you're a videographer, you can import these files straight into software like Premiere Pro or Final Cut to tweak the style and timing even further.
- Archiving: It’s always a good idea to have a clean, editable transcript of your final translation spanish to english audio project. A separate text file is perfect for that.
By keeping the subtitles separate from the video image, you give both yourself and your audience more control over how the content is viewed.
A Few Common Questions Answered
When you're diving into audio translation, a few questions always pop up. Whether you've done this a hundred times or it's your first project, getting these sorted out first makes everything run a whole lot smoother.
How Good Is AI Audio Dubbing from Spanish to English?
Honestly, today's AI dubbing is fantastic at getting the direct, grammatical translation right. It's surprisingly accurate.
Where it can stumble, though, is with the subtleties—the cultural inside jokes, regional slang, or idioms that give Spanish its flavour. This is exactly why you can't just "set it and forget it." A final human check is a must for any professional translation spanish to english audio project.
That's where a good editing tool is non-negotiable. Inside TranslateMom, for example, the Studio Workspace is built for this. You can go through the AI's English script line by line.
The secret weapon here is the Split View in the subtitle editor. It puts the original Spanish and the new English translation side-by-side. You can immediately spot anything that sounds a bit too literal or has lost its original punch and fix it on the spot.
Can I Just Translate Audio from a YouTube Link?
Absolutely. The best platforms are designed for exactly this. Gone are the days of downloading a video from YouTube only to re-upload it somewhere else.
Now, you can just paste a YouTube URL directly into the import field. In TranslateMom, you do this right from the New Task screen. Grab the link from YouTube, Twitter (X), TikTok, or Instagram, paste it in, and the platform handles the rest—it pulls in the video and audio automatically. It’s a huge time-saver if you’re working with content that’s already online.
How Do I Get the Timing Just Right for My Translated Audio?
Perfect timing is what separates a clunky, amateur translation from something that feels polished and professional. The trick is to use a visual audio waveform editor.
This tool shows you a picture of the audio, so you can see every word and every pause from the original Spanish speaker.
The TranslateMom Studio has a waveform editor that lets you visually drag the start and end points for each bit of dialogue or subtitle. This means you can line up the English audio or text perfectly with the speaker’s natural cadence. No more weird gaps or awkward overlaps, just a seamless experience for your new audience.
Ready to get your Spanish content in front of a global audience? Give TranslateMom a try and see how easy accurate, professional-grade audio translation and dubbing can be. Start your first project now.