Ever wondered what a video subtitle generator really is?
Imagine having a personal assistant who can listen to your videos, type out every word, and perfectly time the text to appear on screen—all in a matter of minutes. That's essentially what a video subtitle generator does. It's an AI-powered tool that automatically transcribes the audio from your video and turns it into synchronized text, otherwise known as subtitles or captions.
But these tools go way beyond simple transcription. They are built to solve some of the biggest challenges content creators, marketers, and educators face today. By taking the manual work out of subtitling, they make your video content far more effective.
What Problems Do Subtitle Generators Actually Solve?
The real magic of a subtitle generator is in the problems it makes disappear.
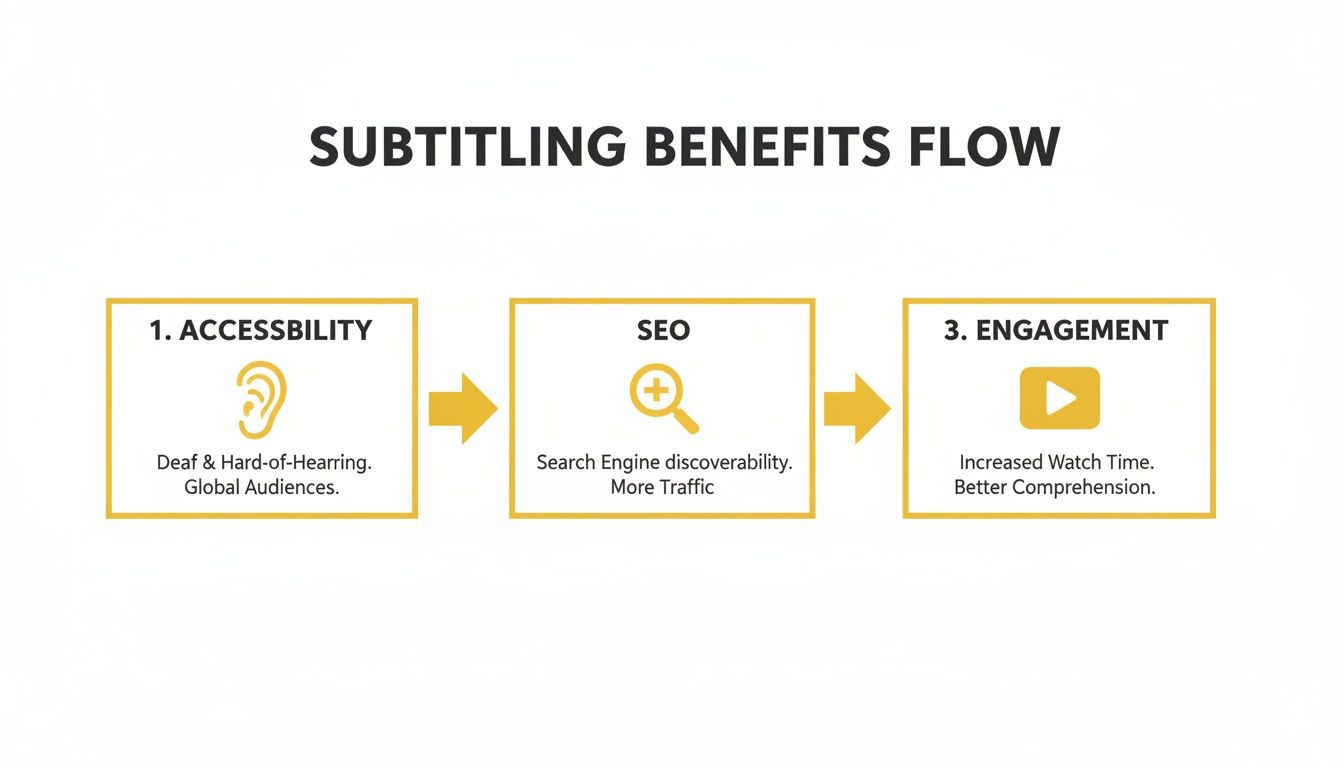
- Accessibility: Right off the bat, they open up your content to viewers who are deaf or hard of hearing. This isn't just about being inclusive; it's about making sure your message can reach everyone.
- Silent Viewing: How often do you scroll through Instagram or TikTok with the sound off? A huge number of videos are watched on mute. Subtitles are what grab and hold attention in a silent feed.
- Search Engine Optimization (SEO): Search engines can’t watch a video, but they are brilliant at reading text. Subtitles give Google a full, keyword-rich transcript to crawl, helping your video rank higher in search results.
- Global Reach: Many generators don't just transcribe; they translate. This feature instantly breaks down language barriers, allowing you to connect with an international audience without hiring a team of translators.
Here in Canada, the need for these tools is exploding. With Canadians watching an average of 3.2 hours of online video daily in 2023, subtitled content is no longer a "nice-to-have." It's essential. This trend is a clear signal that making videos accessible and multilingual is key to standing out.
So, why does this all matter? A video subtitle generator takes the spoken words in your video—which are temporary and hard for search engines to find—and turns them into a permanent, searchable, and globally accessible asset.
It's also worth noting the difference between subtitles and captions, as they serve slightly different purposes. You can learn more about that in our guide on closed captions vs subtitles. Ultimately, this technology has become a cornerstone of any serious video strategy.
How Automatic Subtitle Generation Actually Works
When you upload a video to an automatic subtitle generator, it feels almost magical. But behind the curtain, there's a fascinating bit of tech doing some serious heavy lifting.
Think of the AI as a world-class transcriptionist who can listen, type, and timecode simultaneously. It’s not just hearing words; it’s analyzing every sound to create a perfectly synced script. This all happens in a few key stages.
It starts with the sound. The system first pulls the audio track away from your video file to get it ready for analysis. The quality here is everything—crisp, clear audio with little background noise will always give you better results than muffled voices in a busy café.
The Brains of the Operation: Automatic Speech Recognition
The real core of any video subtitle generator is a technology called Automatic Speech Recognition (ASR). This is how the AI listens to a person speaking and turns it into text.
ASR technology chops the audio into tiny, millisecond-long pieces. It then analyzes the sound waves in each piece to pick out phonemes—the smallest units of sound that make up a language (like the 'k' sound in 'cat'). From there, it strings the phonemes into words and the words into sentences.
To do this accurately, ASR models are trained on thousands upon thousands of hours of real human speech, which teaches them to recognize different accents, speaking speeds, and dialects.
This whole process unlocks some massive benefits for your content, from making it accessible to boosting engagement.
As you can see, turning your video's audio into text has a direct impact on how both people and search engines find and connect with your work.
Getting the Timing Just Right
Of course, a big block of text isn't very useful. The words have to show up on screen at the exact moment they’re spoken. That’s where timestamping comes in.
After transcribing the dialogue, the AI goes back through the audio and stamps every word or phrase with a start and end time, right down to the millisecond.
This is what separates a simple transcript from functional, professional-looking subtitles. When the timing is spot on, the viewing experience is seamless.
For videos with more than one person talking, better tools can even handle speaker diarization. This feature analyzes shifts in vocal pitch and tone to figure out who is speaking when. It then labels the lines accordingly—"Speaker 1," "Speaker 2," etc.—which makes interviews and panel discussions way easier to follow.
You can see this technology in action everywhere, especially on social media. Platforms like TikTok rely on it heavily, and understanding how to auto-generate TikTok captions with AI shows just how mainstream this process has become.
From Raw Text to Polished Final Product
The last step is to make the subtitles easy to read. The raw, timestamped text is broken into neat, digestible chunks that appear on screen.
This formatting process follows standard readability rules, like keeping lines to a certain length and making sure they don't flash by too quickly.
What you get at the end is an excellent first draft, ready for a quick human review. AI is fast and impressively accurate, but it’s not infallible. That’s why having a great editor, like the Studio Workspace inside TranslateMom, is so important. It lets you easily polish the AI's work—fixing a word here, tweaking the timing there—to get a flawless final result.
Choosing the Right Subtitle Generator
Picking a video subtitle generator can feel like a chore, but getting it right is a game-changer. The best tools don't just spit out a text file—they become a core part of your creative process.
A lot of platforms look the same on the surface. But a basic tool gives you raw text, while a professional one offers a full-blown studio to get everything just right. You have to look past the marketing fluff and focus on the features that actually make a difference to your final video.
Think of it like choosing a camera. A point-and-shoot gets the job done, but a DSLR gives you the control to create something truly amazing. The same goes for subtitling; the best tools hand you the controls for every last detail.
Core Features You Can't Live Without
When you're sizing up a subtitle generator, some features are simply non-negotiable. These are the basics that make or break your workflow, and if a tool is missing them, you should probably keep looking.
- High Transcription Accuracy: This is everything. The AI needs to nail the speech-to-text conversion. No AI is perfect, but a top-tier service should hit 95% accuracy or better on clear audio. This saves you from hours of tedious manual corrections.
- Broad Language Support: Your content is only as global as the languages you offer. A solid tool needs to transcribe and, more importantly, translate into dozens of languages. This is how you take a video worldwide with just a few clicks.
- Multiple Export Formats: Professional work demands flexibility. Your generator absolutely must export in standard formats like SRT and VTT for platforms like YouTube. It also needs an option to "burn-in" the captions, which permanently embeds them into the video for sharing on social media.
These three features are the foundation. Get these right, and you have a reliable tool that can handle the essentials without causing headaches.
Advanced Features That Make a Real Difference
Once the basics are covered, the advanced stuff is what separates a good tool from a great one. These are the features that give you creative freedom and make your videos look polished and professional.
A powerful editor is the heart of any serious subtitle generator. For example, the Studio Workspace in TranslateMom isn't just a text box—it's a full environment for tweaking every single aspect of your subtitles.
A visual audio waveform is a complete game-changer. It lets you see the dialogue, making it incredibly easy to drag the start and end points of a caption to perfectly match when someone speaks.
This visual feedback gets rid of the guesswork and helps you create subtitles that feel completely in sync with the video.
Deep style customization is another huge one. The ability to change fonts, colours, and backgrounds ensures your captions match your brand's look. Advanced tools like TranslateMom even add dynamic effects to make your content pop.
To help you sort through what matters, here’s a quick checklist of features to look for when you're comparing different subtitling tools.
Feature Checklist for a Professional Subtitle Generator
| Feature | Why It Matters | Priority Level (High/Medium) |
|---|---|---|
| High Accuracy (95%+) | Reduces manual editing time and ensures professionalism. | High |
| SRT/VTT Export | Standard formats required for most video platforms. | High |
| Burned-In Captions | Essential for sharing videos on social media platforms. | High |
| Visual Waveform Editor | Makes precise timing adjustments fast and intuitive. | High |
| Multi-Language Translation | Unlocks a global audience for your content. | High |
| Style Customization | Allows you to match subtitles to your brand's look and feel. | Medium |
| Karaoke-Style Animations | Boosts engagement, especially for short-form video. | Medium |
| Brand Logo/Watermark | Helps maintain brand consistency across all your videos. | Medium |
| Bilingual Display | Incredibly useful for language learning or international content. | Medium |
This table should give you a clear idea of what to prioritize. The "High" priority features are must-haves for any serious creator, while the "Medium" ones are what elevate a tool from functional to fantastic.
Ultimately, the right video subtitle generator blends powerful AI with a smart, user-friendly editor. It handles the heavy lifting of transcription but leaves the final creative decisions—timing, accuracy, and style—in your hands. That’s the combo you need to produce videos that truly stand out.
A Step-by-Step Guide to Creating Subtitles
Knowing what makes a great video subtitle generator is one thing, but actually using one is where the rubber meets the road. So, let's put theory aside and walk through a real-world example, from start to finish. We'll use TranslateMom to show you exactly how to turn raw video into perfectly polished subtitles.
This guide will take you through the entire workflow, from the moment you upload your file to when you export the final, captioned video. By the end, you'll know precisely how to create accurate, stylish subtitles that grab—and keep—your audience's attention.
Step 1: Getting Your Video Into the System
Every project starts by bringing your video into the platform. With a tool like TranslateMom, this part is dead simple. You’ll begin at the New Task screen, where you have a couple of easy options.
- Direct File Upload: Just drag and drop your video file right into the browser. This method can handle hefty files up to 5GB, so don't worry about high-res content. Quick tip for keyboard users: just hit the
Fkey to pop open your file picker. - Link Import: Or, you can just paste a URL from a major platform like YouTube, Twitter (X), TikTok, or Instagram. The system fetches the video for you, which means you don't have to download it first. Super handy.
Once the video is in, you tell the AI what you want it to do.
- Source Language: What language is spoken in the video?
- Target Language: What language should the subtitles be in?
- Choose a Service: Pick what you need—Transcription for same-language captions, Translation for subtitles in a new language, or even Dubbing for a new AI audio track.
Hit go, and the AI will get to work, whipping up your first draft of subtitles in just a few moments.
Step 2: Refining and Editing in the Studio
The raw AI output is a fantastic starting point, but the editor is where the real magic happens. This is where you transform a good transcript into perfect subtitles. In TranslateMom, this is all done in the Studio Workspace, which is laid out to make editing fast and intuitive.
The main part of the screen is taken up by the Special Player. Think of it as a custom video engine that gives you a live preview of your subtitles as you work. It shows you exactly how your custom styles, animations, and branding will look in the final cut.
Over on the right (or at the bottom), you’ll see the Subtitle Editor. It's a simple, scrolling list of every caption. To edit, just click a line and start typing. The video even pauses automatically, letting you focus without any distractions.
This is the crucial human-in-the-loop step. While AI gets you 95% of the way there, a quick human review ensures 100% accuracy. It’s your chance to fix any tricky names, brand terms, or slang the machine might have missed.
For the perfectionists out there, you can dial in the exact start and end times for each caption. And if you're translating, you can flip on a Split View to see the original text right next to your translation—a massive help for keeping the context and meaning just right.
Step 3: Nailing the Timing with the Audio Waveform
One of the most powerful features in a pro-level subtitle generator is the visual audio waveform. This is a graph of your video’s sound, showing you the peaks of spoken words and the flat lines of silence.
Instead of guessing at timings, you can see them. Just drag the handles of a caption block to line it up perfectly with the start and end of someone speaking on the waveform. This lets you trim out any dead air and make sure captions pop up the instant someone talks and disappear the second they stop.
This visual feedback is what separates clunky, amateur captions from a seamless, professional result.
Step 4: Styling and Branding Your Subtitles
With the words and timing locked in, it's time to make it all look good. The Studio Tabs panel gives you full creative control over the appearance of your subtitles.
- Style Tab: Here, you can change everything from the font and text size to the colour, outlines, and shadows. You can even add a slick, semi-transparent background to make the text pop against a busy video.
- Karaoke-Style Captions: Want to create super-engaging social media clips? Apply a karaoke-style animation that highlights words as they're spoken. The app handles all the word-level timing for you automatically.
- Brand Tab: To keep things consistent, you can upload your logo or a custom watermark. The editor lets you easily resize it and stick it anywhere you want on the screen.
This kind of customization makes sure your subtitles not only improve accessibility but also fit right in with your brand's look and feel. As you explore more tools for video creation, you might also find handy resources for creating AI videos that can work great alongside your subtitling efforts.
Step 5: Exporting Your Final Product
When you're happy with how everything looks, you have two main ways to get your work out into the world:
- Burn-in (Export Video): This option creates a brand-new MP4 video file with your subtitles, styles, and logo permanently "baked in." This is perfect for social media, where tons of people watch with the sound off.
- Download Subtitles: If you need to use the captions in editing software like Premiere Pro or upload a separate file to YouTube, you can just download the subtitles. You can grab them in standard formats like SRT or VTT. If you want to dive deeper into these formats, check out our guide on the TXT to SRT converter.
And that’s the whole process! From a simple upload to detailed editing and flexible exports, you have everything you need to take control and produce professional-quality subtitles every single time.
Advanced Subtitling Techniques for Pro Results
Once you’ve nailed the basics of generating and editing subtitles, it’s time to level up. Advanced techniques can turn simple captions from an accessibility feature into a serious engagement tool.
This is what separates a standard video from one that truly grabs and holds attention, especially on fast-scrolling platforms like TikTok or Instagram. Think of subtitles as another design element—one you can animate, style, and layer to tell a better story and build a unique visual brand.
Creating Dynamic Karaoke-Style Captions
One of the best ways to hook viewers is with karaoke-style captions. You’ve definitely seen them: the words light up in real-time as they’re spoken. This trick keeps eyes glued to the screen, making sure your message gets across even with the sound off.
And it’s easier than you think. With a tool like TranslateMom, you can do this right in the editor:
- Head over to the Style tab in the Studio Workspace.
- Pick from a bunch of ready-made animation presets or create your own from scratch.
- You can change the highlight colour, font, and background to match your brand perfectly.
The software uses its word-level timing to automatically sync the animation with the audio. If you change a word, the Smart Sync feature instantly adjusts the animation for you. No more tedious manual fixes—just polished, professional-looking videos.
Leveraging Bilingual Subtitles for Learning
Another killer feature is displaying subtitles in two languages at once. This is a game-changer for language teachers or anyone creating content for a bilingual community. It lets viewers see the original text and its translation side-by-side.
This simple trick transforms your video into an interactive learning tool. Viewers can instantly connect idioms and phrases with their direct translations, which is a massive help for language acquisition.
In TranslateMom, you just have to enable Dual Language Mode. This stacks the source and translated subtitles right on the video. It’s an incredible way to serve a wider audience and position your content as a valuable educational resource.
Streamlining Team Collaboration on Subtitle Projects
For agencies, businesses, or any creative team, subtitling is rarely a one-person job. A professional-grade tool needs features that keep the workflow smooth and organized, so everyone stays on the same page.
Modern platforms are built for this kind of teamwork:
- Suggestions: Instead of just editing a teammate's work, you can "suggest" a change. This flags the edit for a project lead to approve or reject, keeping the final say in the right hands.
- Version History: Mistakes happen. With a built-in history tracker, you can see every previous version of your subtitle file. If someone makes a major error, you can restore an older version with a single click. No more lost work.
- Cloud Sync: Every edit saves to the cloud in real-time. This means every team member, whether they're in the office or across the globe, is always working on the latest version of the project.
These features are non-negotiable for big localization projects where accuracy is key. If you're weighing your options, check out our guide on the best transcription tool of 2025 to see how different platforms compare. By using these advanced techniques, you can make your videos not just accessible, but genuinely engaging and professionally produced.
Common Subtitling Mistakes and How to Avoid Them
Even with the best tools, a few small mistakes can creep in and throw off the viewing experience. The good news? They're usually simple to fix once you know what to look for.
Let's walk through the most common pitfalls so you can make sure your subtitles are always polished and professional.
Trusting Raw AI Output Blindly
This is the biggest mistake I see people make: accepting the AI's first draft without a quick once-over. While today’s AI is incredibly accurate, it can still stumble over unique names, industry jargon, or casual slang.
The Fix: Always give it a quick proofread. In a tool like TranslateMom, you just click any line in the Subtitle Editor to make instant corrections. This five-minute human check can take a 95% accurate transcript and make it absolutely perfect.
Mismatched Subtitle Timing
Ever seen subtitles pop up way too early or hang around long after someone has finished speaking? It feels weird and can really confuse your viewers. This usually happens when the AI gets tripped up by awkward pauses or super-fast speech.
- The Fix: Use a visual audio waveform. In TranslateMom’s Studio Workspace, the waveform gives you a visual map of the audio. You can literally just drag the start and end points of any caption to line them up perfectly with the spoken words, getting rid of any awkward timing.
Poor Readability and Design
What good are subtitles if you can't read them? A tiny font, a colour that blends into the background, or weird line breaks will just frustrate your audience.
- The Fix: Take control of the styling. The Style tab in TranslateMom puts you in the driver's seat, letting you adjust the font, size, colour, and even background. Best of all, you see the changes live, so you can make sure your text is crystal clear against any video background.
Got Questions? We've Got Answers
Still have a few things you're curious about when it comes to video subtitle generators? Let's clear up some of the most common questions we hear.
How Accurate Are AI Subtitle Generators, Really?
Honestly, modern AI is pretty amazing. On a video with clear audio, it's not uncommon to see accuracy hit north of 95%. But that number can definitely take a hit if you're dealing with thick accents, super-specific technical jargon, or a lot of background noise.
This is exactly why having a good editor is a non-negotiable. No AI is infallible, which is why a tool like TranslateMom’s Studio Workspace is so important. It lets you zip through the AI's transcript and make those little tweaks, closing the gap from 95% to a perfect 100% without much fuss.
Can I Translate My Subtitles Into Other Languages?
You bet. That's one of the main reasons people use a platform like ours. The best way to get top-quality results is a simple two-step process.
First, you let the AI generate captions in the video's original language and you clean them up until they’re perfect. Once that source transcript is flawless, you can translate it into dozens of other languages in just a couple of clicks. Inside TranslateMom, you can even kick off a new translation right from the Studio Tabs if you decide to add another language later.
What’s the Difference Between Open and Closed Captions?
The key difference is all about viewer control.
- Open Captions are "burned into" the video file itself. Think of them as part of the image—they’re always on and the viewer can't turn them off. This is your go-to for social media, where videos often start playing on mute.
- Closed Captions (CC) are a separate text file that rides alongside the video. Viewers can turn them on or off using the video player's controls.
A good subtitle generator should handle both. When you're done in TranslateMom, you can export a brand new video file with the captions burned right in, or you can just download the text files (like an SRT or VTT) to use as closed captions.
Ready to create subtitles that look professional, read perfectly, and reach a global audience? TranslateMom puts all the tools you need to transcribe, translate, and style your video content right at your fingertips. Start your first project for free and see for yourself.
