Translating your audio into English used to be a massive headache, a complex and expensive job you’d farm out to a big studio. Not anymore.
These days, getting your audio translated into English is one of the smartest and easiest ways to connect with one of the biggest online audiences in the world. Modern AI tools have put this power right into the hands of creators everywhere, letting you instantly expand your content's reach, discoverability, and impact.
Why Translating Audio to English Unlocks Global Audiences
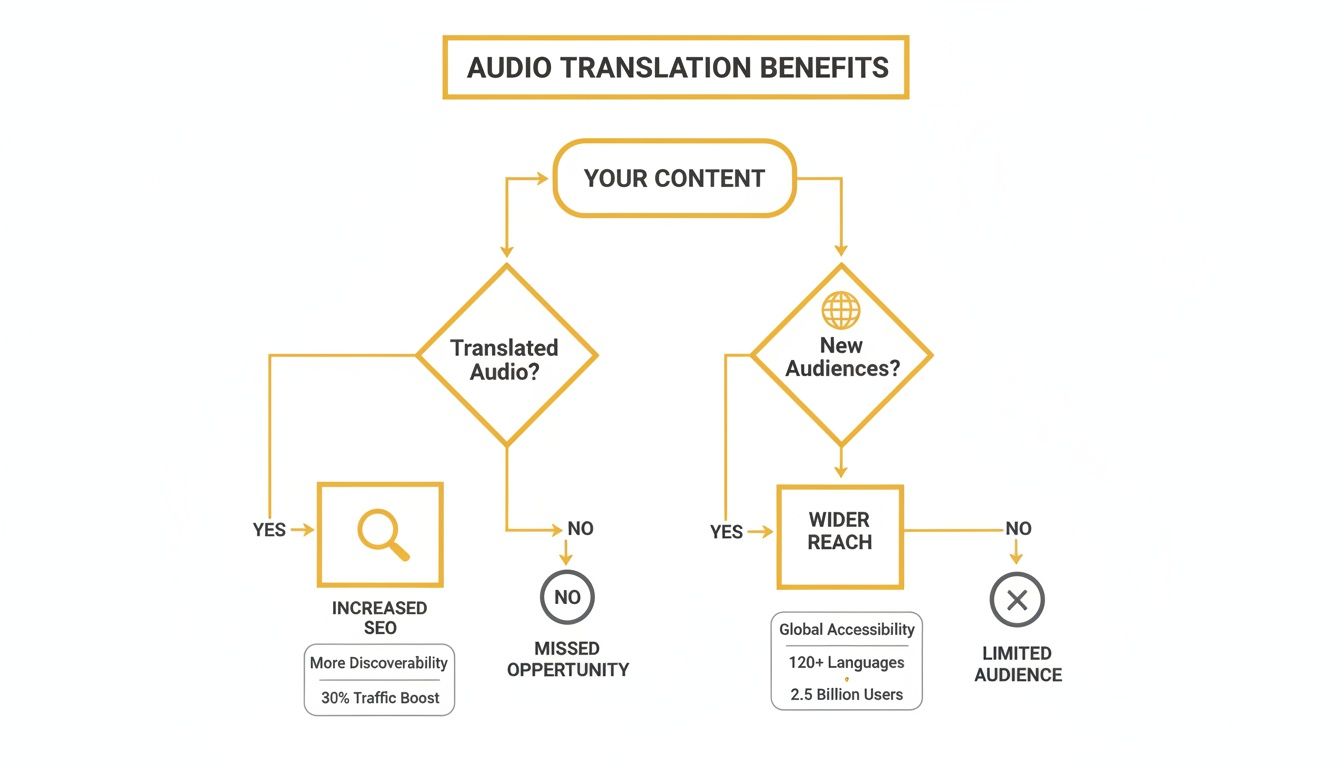
Getting your content into English is a game-changer for creators, businesses, and educators. When your videos and audio are accessible to English speakers, you’re suddenly playing in a much bigger league, massively boosting your potential for growth and engagement.
Think about it—this isn't just about language; it’s about visibility.
Expand Your Reach and SEO Power
When you add English subtitles or dub your audio, you're giving search engines a ton of new text to crawl and index. Platforms like YouTube thrive on text data—your titles, descriptions, and especially your captions—to figure out what your content is about and who to show it to.
By adding an English version, you’re making your content discoverable to a massive new audience searching in English. It's a huge SEO boost.
A tutorial you filmed in Spanish or a podcast you recorded in French can suddenly find a brand-new, international audience. This multiplies its value and gives your old content a new lease on life.
Overcoming Old Barriers with New Technology
Not long ago, professional translation and dubbing were ridiculously expensive and slow. You needed to hire specialized agencies and sink a lot of cash into the process. This kept smaller creators and businesses from even thinking about going global.
Well, that’s all changed.
AI-powered platforms have completely torn down the old walls of cost and complexity. You can now get professional-grade results right from your browser, letting anyone audio translate to English and connect with viewers worldwide in minutes, not weeks.
This is a huge shift. You can now handle the entire process yourself. With a tool like TranslateMom, you can just:
- Import your media easily: Drag and drop a video file or just paste a link from YouTube, TikTok, or X (formerly Twitter) into the New Task screen.
- Choose what you need: In the processing phase, select "Translation" for subtitles or "Dubbing" for a whole new AI-voiced audio track.
- Tweak and publish: Jump into the Studio editor to fine-tune the results and export a finished video that’s ready for social media.
This kind of accessibility means independent creators can build international communities and businesses can market their products globally without a massive budget. It’s a total levelling of the playing field, making global communication a real possibility for everyone.
Choosing Your Translation Path: Subtitles vs. Dubbing
So, you're ready to translate your audio to English. The first big question you need to answer is: how do you want your audience to experience it? Do you want them reading along with subtitles, or hearing a brand-new English audio track? This decision really shapes everything—the viewer's experience, your workflow, and the overall vibe of your content.
This choice isn't just about preference; it's about strategy. Both paths ultimately lead to expanding your content's reach, whether by boosting your SEO with searchable text or creating a more immersive experience for new viewers.
As you can see, no matter which route you take, you're opening up your content to a much bigger audience.
Understanding Your Core Options
Modern tools give you a few main ways to go about this. In a platform like TranslateMom, you'll see these presented as distinct services right after you upload your file.
Here’s a quick breakdown of what you’re choosing between:
- Transcription: This is step zero. It simply creates a text document of the original audio in its native language. It's essential if you want to create closed captions (CC) for accessibility or even turn your podcast episode into a blog post.
- Translation (Subtitles): This is the classic approach. It takes that initial transcription and translates it into timed English text that appears on screen. It's perfect for tutorials, interviews, or news clips where the original speaker’s voice and emotion are key to the experience.
- Dubbing: This is the most immersive option by far. It generates a completely new AI audio track in English, effectively replacing the original speaker's voice. This is a fantastic choice for documentaries, entertainment, or marketing videos where you want to minimize distractions and let the viewer just watch and listen.
To make the choice a little clearer, I've put together a table comparing the main methods.
Translation Method Comparison
Choosing the right translation method depends entirely on your content and your goals. This table breaks down the pros and cons of the most common approaches to help you decide what's best for your project.
| Method | Best For | Pros | Cons |
|---|---|---|---|
| Transcription Only | Creating blog posts from audio, internal notes, accessibility (CC) | Low cost, fast, creates searchable text content | Doesn't translate, not useful for foreign audiences |
| Subtitles | Educational content, interviews, documentaries, social media clips | Preserves original audio, improves SEO, helps with language learning | Can be distracting for some viewers, requires reading |
| AI Dubbing | Entertainment, marketing videos, e-learning courses, narrative content | Highly immersive, no reading required, feels more natural | AI voice may lack human nuance, higher cost than subtitles |
Ultimately, there's no single "best" method—just the best one for your specific video and audience.
Subtitles: The Versatile Standard
For most creators, translated subtitles are the go-to. They offer a great balance, making your content accessible while keeping the original performance intact.
When you select "Translation" in a tool like TranslateMom, you’re taken to an editor where you can see the magic happen. The Split View is a lifesaver here, showing your original transcription next to the new English translation. This is super important for making sure you're capturing the meaning, not just doing a word-for-word swap. You can then drag and adjust the timing right on the audio waveform to make sure the captions pop up at the perfect moment.
Here's a pro tip for language-learning content: use a Dual Language Mode. This stacks both the original and the English subtitles on the video at the same time. It’s an amazing way to provide extra value to your audience.
AI Dubbing: For Seamless Immersion
AI dubbing is where things get really exciting. Instead of just adding text, you're giving your content a whole new voice. The process is dead simple: just select "Dubbing," and the AI gets to work generating a new audio track in a natural-sounding English voice.
This is the way to go when you want to make it effortless for your audience. They can just sit back, watch, and listen without the cognitive load of reading. It works especially well for storytelling or for quick, engaging videos on social media. While the AI is impressively accurate, I always recommend a quick quality check to make sure it's pronouncing specific names or industry jargon correctly.
Your Practical Walkthrough Using TranslateMom
Theory is one thing, but seeing how a tool actually works is where it all clicks. Let's run through a real project and audio translate to english, showing you how a tool like TranslateMom breaks down a tricky task into a few simple stages.
Kicking Off Your First Translation Task
It all starts on the New Task screen. The main goal here is to get your audio or video into the system with zero fuss. You’ve got a couple of options, built for how people actually work.
- File Upload: Got the file on your computer? Just drag it right into the browser window. The system is built to handle big files, so don't worry about size—it supports videos up to 5GB. Pro tip: press the
Fkey to pop open the file picker instantly. - Link Import: This is a huge time-saver for content that's already online. If your video is on YouTube, TikTok, or X (Twitter), just grab the URL, paste it in, and the app fetches it for you. No need to download anything first.
Once your file is loaded, you tell the system what to do. You’ll pick the Source Language (what’s being spoken) and the Target Language (English, in this case). Then, just choose if you want "Translation" for subtitles or "Dubbing" for a new AI-voiced audio track.
Getting Hands-On in the Studio Editor
After the AI does its initial pass, you land in the "Studio." This is your command centre for polishing the translation into something perfect. The layout is divided into three zones designed for speed and precision.
On the left, there’s a special video player that gives you an accurate live preview of your subtitles, including any styling or karaoke effects. It's not just a basic playback window; it shows you precisely what your final exported video will look like.
The real work happens in the Subtitle Editor. It’s a clean, scrolling list of every caption. When you click on a line to edit the text, the video smartly pauses, letting you focus without any distractions.
This is where you can get really precise. You can tweak the start and end times of each caption down to the millisecond. Even better, you get a visual audio waveform, so you can literally see where the speech starts and stops. Just drag the timing markers on the waveform to sync everything up perfectly with the dialogue.
Fine-Tuning and Pro-Level Edits
For translation projects, the Split View feature is a game-changer. Flip this on, and you’ll see the original source text right next to your new English translation. This side-by-side view is crucial for making sure you’ve captured the meaning and nuance, not just a word-for-word translation.
The Studio also has a few powerful features for collaboration and safety. As you edit, your work is constantly auto-saved to the cloud. You can close your browser, come back later, and pick up exactly where you left off. If you ever make a mistake, you can just pull up the "History" dialog and restore a previous version of your work.
Finally, learning a few keyboard shortcuts can seriously speed up your workflow.
| Key | Action |
|---|---|
| Space | Play or Pause the video |
| + / - | Quickly increase or decrease font size |
| [ / ] | Move a subtitle line up or down the list |
This blend of powerful AI automation and an intuitive editor gives you total control, ensuring your English translation is both accurate and perfectly timed.
Styling Subtitles For Maximum Impact And Readability
Getting an accurate translation is a huge win, but it’s only half the story when you audio translate to english. If your audience has to squint or struggle to read the text, your message gets completely lost. Great subtitles shouldn't even feel like they're there—they should be effortless to read, clear, and styled in a way that fits your content.
This is where a little visual customization goes a long way. Inside a tool like TranslateMom, you’ll find a Style tab in the Studio sidebar. Think of it as your control panel for turning plain, boring text into professional-looking captions. It lets you instantly tweak the essentials like font, size, and colour, making sure your words pop against any background.
Customizing The Basics For Readability
First things first, let's make sure people can actually read the text. The name of the game is high contrast and comfort.
- Font Choice: Stick with a clean, sans-serif font. They're way easier to read, especially on smaller screens.
- Size and Colour: You can use the
+and-keys for quick size adjustments. For colour, you can’t go wrong with a classic white or yellow—they stand out against almost anything. - Background and Outline: This is a pro move. Adding a subtle, semi-transparent background box or a text outline makes a world of difference. It literally lifts the text off the video, so it stays readable even when the scene behind it is bright or busy.
The best part is that these changes happen in real-time right on the video player. You get to see exactly what your audience will see, no guesswork involved.
Your subtitles are an extension of your content's visual identity. Consistency in font and colour across your videos helps build a recognizable brand and creates a more polished, professional viewing experience.
Creating Dynamic Karaoke-Style Captions
For social media, let's be honest, static subtitles can be a bit of a snooze-fest. You need something that grabs and holds attention. This is where "Karaoke" style captions—where words light up as they’re spoken—really come alive.
In TranslateMom's Style tab, you can apply these animations with just one click using the built-in presets. The app automatically syncs the timing for you word-by-word, creating a dynamic effect that keeps viewers glued to the screen. The "Smart Sync" feature is pretty clever; it keeps the animation in time even if you edit the text, saving a ton of manual work.
If you want to get deeper into the art of making great captions, we've got a whole guide on subtitling and translation.
Adding A Professional Branded Touch
Okay, your subtitles look amazing. The final touch? A watermark. Head over to the Brand tab in the Studio sidebar and upload your logo.
From there, you can just resize it and drag it into any corner of the frame. It’s a simple step, but it instantly reinforces your brand and helps protect your content as it gets shared around. Every translated video becomes a polished, professional asset for your channel.
Refining AI Translations For Professional Quality
An AI's first pass at an audio translate to english task is a fantastic starting point. It often gets you 90% of the way there in just a few moments. But that last 10%? That’s where the real magic happens, where you transform a good translation into a great one. This is the crucial human touch, turning something technically correct into content that feels completely natural to a native English speaker.
This polishing process happens right inside an editor, like Translate.mom's Studio. You aren't re-translating from scratch. Instead, you're elevating the AI's work by catching those subtle nuances in grammar, tone, and context that only a person can truly understand.
The Human Touch in Post-Editing
Think of yourself as the quality control expert. Your job is to read through the generated subtitles while listening to the original audio, asking the important questions. Does a certain phrase really land well in English? Is an idiom being translated literally instead of conveying its actual meaning?
This is where the Split View feature in Translate.mom really shines. It puts the original text and your English translation side-by-side, making a direct comparison incredibly easy. This view helps you make sure the core message and all its subtleties are perfectly preserved.
A huge part of professional refinement is listening for the speaker's intent. AI is great with words, but it often misses sarcasm, humour, or emphasis. Your edits should ensure the tone of the English text perfectly matches the tone of the original speaker.
This focus on quality really pays off. The latest industry reports from firms like Intento show that customized machine translation is getting incredibly close to human performance. One study even found that human reviewers sometimes couldn't reliably tell the difference between AI and human work. This refined approach has been shown to cut down post-editing time by an average of 30–55% compared to older workflows, which is a massive win for creators on platforms like YouTube who need to publish quickly.
Improving Accuracy from the Start
You can also give the AI a head start by ensuring the initial transcription is as clean as possible. It's simple: the better the source text, the better the final translation.
- Audio Quality: Clear audio is everything. If your source file has a lot of background noise, the AI might misinterpret certain words. To get the best results, it’s always a good idea to remove background noise from audio before you even start the translation.
- Speaker Identification: For conversations with multiple people, using a speaker identification (or diarization) feature is a game-changer. It helps the AI correctly assign dialogue to each person, preventing a jumbled mess of text and making the final translation much more coherent and easier to edit.
By combining a clean source file with your own careful post-editing, you can create English translations that aren't just accurate—they’ll genuinely connect with your new global audience.
Getting Your Translated Video Out There
Alright, you've done the hard work of refining your translation. Now for the fun part: sharing it with the world. How you get your content from the editor to your audience really boils down to where it's going to live. You've got two main paths: baking the subtitles right into the video or keeping them as a separate file for more control.

When you are finished in a tool like TranslateMom, you have two main export options that cater to these different needs.
The "Burn-In" Method for Social Media
The simplest, most direct route is to "burn-in" your subtitles. This means rendering a new video file with your subtitles, styling, and logo permanently "baked" into the video.
This is my go-to for social media. For platforms like Instagram, TikTok, or X, it’s a lifesaver. It guarantees that everyone sees your captions exactly as you intended, no matter their phone settings. Those cool karaoke-style captions you designed? They'll always be on display.
Inside a tool like TranslateMom, this is as easy as hitting "Export Video." The whole process happens on the server, so your computer is free to do other things. Once it's ready, you just download the new MP4 file and upload it. Done.
Separate Subtitle Files for Ultimate Flexibility
For more professional workflows or platforms like YouTube, downloading the subtitle file itself is the way to go. This gives you—or your video editor—maximum control over the final product.
You'll usually see a few standard format options:
- SRT (.srt): This is the old reliable. It’s a super basic format with just plain text and timestamps, making it compatible with pretty much every video player and editing software out there, like Premiere Pro or Final Cut.
- VTT (.vtt): A bit more modern, VTT is the standard for web video. It lets you include basic styling like bold and italics right in the file, which is great for HTML5 video players.
- TXT (.txt): This just gives you a clean transcript of the dialogue without any timestamps. It's perfect if you want to turn your video into a blog post or create other written content from it.
Choosing the right format is key. If I'm sending a file to a video editor using Premiere Pro, SRT is a no-brainer. For a video going straight to a website where I want a bit more styling control, I'll grab the VTT file.
This approach gives you total freedom. You can import an SRT file into your main video project, tweak the timing, or upload it to YouTube to give viewers the option of turning closed captions (CC) on or off.
If you're managing a ton of content, especially for multiple languages on a platform like YouTube, you can save a lot of time by mastering the YouTube Upload API. It lets you upload videos and their subtitle files automatically, cutting out a ton of manual work.
Common Questions About Audio To English Translation
If you're just getting started with audio translation, you probably have a few questions. I get it. Let's clear up some of the most common ones so you can dive in and get your projects done right.
How Long Does The AI Translation Take?
This is probably the number one question I hear. The speed to audio translate to English with AI is surprisingly quick, but it really comes down to the length of your audio file.
For a standard 10-minute video, a tool like TranslateMom can whip up the first draft of the transcription and translation in just a couple of minutes. It’s a game-changer.
Of course, AI dubbing takes a bit more horsepower to create a whole new audio track. But even then, it’s lightyears ahead of traditional dubbing studios that might take days or even weeks. The initial AI part is fast; how much time you spend fine-tuning it afterward is completely up to you.
Can I Translate Directly From a YouTube Link?
Yes, absolutely! This is one of the best workflow hacks. Modern tools are built specifically for this, saving you the annoying step of downloading videos first.
With a platform like TranslateMom, you can just grab a URL from YouTube, TikTok, or even X (formerly Twitter) and paste it straight into the New Task screen. The app pulls in the video for you, and you can get right to translating or transcribing. It makes working with online content so much more efficient.
What Is The Difference Between SRT And VTT Files?
You'll see these two file formats everywhere. They both do the same basic job—storing your subtitles—but there's a key distinction you should know about.
- SRT: Think of SRT as the universal standard. It’s just plain text with simple start and end timestamps. Its main advantage is its simplicity, which means it works on pretty much every video player and editing software out there.
- VTT: This is the more modern option, built on the foundation of SRT. VTT files let you do more, like adding bolding, italics, and even controlling where the text appears on the screen. It's the go-to format for web videos where you want that extra bit of visual polish for your captions.
Ready to unlock your global audience? With TranslateMom, you can start translating your audio to English in seconds. Try it for free today!