Let's be honest, getting rid of distracting background noise in your videos is one of the fastest ways to look like a pro. It's all about using software to hunt down and dial back those annoying sounds—the air conditioner hum, the faint hiss from your gear, or even traffic noise outside your window. When you get it right, your audience can actually focus on what you're saying, instantly transforming a video that feels amateur into something polished and credible.
Why Crystal-Clear Audio Is Your Biggest Differentiator
We spend so much time obsessing over the visuals. We want that perfect lighting, sharp 4K resolution, and slick colour grading. And while that stuff matters, bad audio can torpedo all of it in a heartbeat.
A video can look absolutely stunning, but if the audio is a mess, it just screams amateur. Think about it—that subtle echo from an empty room or a distant siren can instantly pull your viewer out of the moment.
This goes way beyond just making things sound nice; it's about building trust. Clean audio makes your message feel more authoritative. Annoying background noises send a subconscious signal to your audience that your content might not be high-quality or even trustworthy. That’s why video background noise removal isn’t just a technical fix; it’s a critical step in building your brand's credibility.
The True Cost of Bad Audio
Poor audio quality has a real, measurable impact. It puts up a wall between you and your viewer, making them work harder to understand you. This friction often leads to bigger problems:
- Lower Engagement: People have a quick trigger finger. If the audio is grating, they'll click away without a second thought.
- Reduced Watch Time: Annoying sounds kill attention spans, which can seriously hurt your video’s performance on platforms like YouTube.
- Damaged Credibility: Noisy audio can make even the most brilliant content feel cheap and less believable.
The consequences are bigger than you might think. A comprehensive survey actually found that one in four Californians (25 percent) are less likely to trust a brand if the audio in their ads is just a bit too quiet, let alone if it's echoey or distorted. It really shows how vital clear audio is in today's world. If you want to dig deeper, you can discover more insights about why audio quality shapes brand perception on coalcreative.com.
Setting the Stage for Clear Communication
At the end of the day, cleaning up your audio is about respecting your audience's time. You’re making sure nothing stands in the way of your message. Whether you’re creating a marketing video, an online course, or a quick social media clip, clean audio is what gives your content that premium, authoritative feel.
By prioritizing clean audio, you're not just fixing a technical problem—you're signaling to your audience that your message is worth hearing clearly. It’s the invisible foundation of professional video content.
This is especially critical before you try to create subtitles or generate an AI dub with a tool like TranslateMom. Noisy audio throws off transcription engines, which means you'll get inaccurate captions and flawed translations. A noise-free audio track is the essential first step for any video localization project, ensuring your message lands perfectly with a global audience.
Diagnosing Your Audio Problems Like a Pro

Before you jump into any video background noise removal, you have to play detective. Trying to fix an audio problem without knowing what it is is like trying to find your way in the dark—you'll probably just bump into things and make a bigger mess.
Your first step is non-negotiable: grab a good pair of headphones. Seriously. Your laptop speakers are lying to you. They are designed for convenience, not clarity, and they hide all the nasty little details like low-frequency hums or high-pitched hiss that can drive a viewer crazy. A decent set of over-ear headphones will tell you the real story.
Identifying the Common Culprits
Listen through your entire track, but pay special attention to the quiet parts between the words. That’s where the noise likes to hide in plain sight. Your mission is to figure out what kind of noise you're dealing with.
- Constant Noises: This is the steady, unchanging stuff that creates a "noise floor" under everything else. Think about the drone of an air conditioner, the whir of a computer fan, or the static hiss from a cheap cable.
- Intermittent Noises: These are the random, unpredictable sounds that pop up and ruin a perfect take. A dog barking next door, a phone notification, a sudden cough, or a mouse click are all classic examples.
- Reverb and Echo: This one isn't "noise" in the traditional sense, but it’s just as damaging. It's the sound of a voice bouncing off hard surfaces in an untreated room, which gives the audio a hollow, unprofessional feel.
Knowing which enemy you're facing is half the battle. You use a different tool to fix a constant hum than you would to remove a sudden cough. This diagnostic step prevents you from just slapping a filter on the whole track and accidentally mangling the voice you’re trying to save.
Your Auditory and Visual Checklist
Once your headphones are on, it’s time for a systematic check. Listen for each type of noise and jot down what you hear. Is the hum always there, or does it get louder? Are there clicks during the most important lines?
Pro Tip: Don't just listen—look. Your editing software shows you an audio waveform for a reason. It’s a visual map of your sound. Constant noise often shows up as a thick, fuzzy band even when no one is talking. Sudden clicks look like sharp, vertical spikes.
Analyzing the waveform helps you pinpoint exactly where the problems are. For instance, if you're working in TranslateMom's Studio editor, the built-in waveform is perfect for matching subtitles to speech. You can use that same visual cue to spot noisy "silent" sections that need to be cleaned up or cut out entirely by dragging the start and end points of a subtitle to match speech patterns perfectly.
Sometimes, the problem isn't even in the room you recorded in. If you’re working with audio recorded over the internet, network issues can cause clicks and dropouts that sound like recording errors. Before you spend hours on fixes, it’s a good idea to run a VoIP bandwidth test to ensure crystal-clear audio to rule out packet loss or jitter.
Taking a few minutes to do this diagnosis will save you a ton of time and frustration later. It’s a professional habit that pays off big time. And if you’re recording on the move, getting clean audio from the start is crucial. Our guide on audio recording with an iPhone has some great tips for that.
Your Toolkit for Removing Background Noise
Picking the right tool for video background noise removal isn't about finding one "best" option. It's about matching the right software to your specific project, your audio problem, and your budget. The good news is you have options, from free, hands-on software to powerful AI plugins that almost feel like magic.
Honestly, the best place to start is often with the tools you already have. Professional video editors like Adobe Premiere Pro and DaVinci Resolve come with some solid built-in audio repair features. They're perfect for dealing with moderate, consistent sounds like a low-level hum or computer fan hiss without ever having to leave your timeline. They're convenient, but for really complex noise, you'll probably need something more specialized.
Free and Open-Source Solutions
If you're working on a tight budget, don't worry—free software can get you surprisingly far. The undisputed king here is Audacity, a free, open-source audio editor that's been a go-to for creators for years. It might not look as flashy as paid alternatives, but its "Noise Reduction" effect is a workhorse, especially for constant background drone.
The process in Audacity is pretty straightforward:
- First, you highlight a few seconds of pure background noise in your recording. This is your "noise print."
- Then, you tell Audacity to learn that sound.
- Finally, you apply the effect to your entire voice track, and it intelligently subtracts that unwanted noise pattern.
This technique is fantastic for predictable sounds—think air conditioners, refrigerators, or consistent fan noise. It can struggle a bit with unpredictable sounds like passing traffic, and if you get too aggressive with the settings, it can make the voice sound a little thin or watery.
AI-Powered Plugins and Cloud Services
When you absolutely need clean, professional-sounding audio, AI-driven tools are where it's at. These aren't just subtracting a static sound. They use machine learning to actually tell the difference between a human voice and all the other junk, preserving the natural tone and clarity of the speaker.
This category is home to heavy-hitters like the plugins from iZotope RX and cloud-based services like Adobe Podcast. These tools can fix almost anything you throw at them, from barking dogs and clacky keyboards to horrible room echo. The results are often so good it's hard to believe the noise was ever there.
The real game-changer with AI denoisers is how they handle complex, random sounds. Because they analyze audio in context, they can save recordings made in terrible environments that you would've had to scrap otherwise.
Of course, the best way to deal with noise is to prevent it in the first place. Investing in the right voice-over equipment for beginners can make a world of difference before you even hit record.
For a deeper dive into all the different software options out there, you should also check out our guide on how to remove background noise from audio.
Comparison of Noise Removal Tools
To help you decide, here’s a quick breakdown of the common tools you'll encounter. Think about what kind of noise you're dealing with and how much time you're willing to spend.
| Tool Category | Examples | Cost | Best For | Limitations |
|---|---|---|---|---|
| Built-in NLE Tools | Premiere Pro (Essential Sound), DaVinci Resolve (Fairlight) | Included with NLE | Quick fixes for low-level, consistent hum or hiss | Lacks precision for complex or variable noises |
| Free Editors | Audacity | Free | Budget projects with steady background noise (fans, A/C) | Can introduce artifacts; struggles with non-constant noise |
| AI Cloud Services | Adobe Podcast, Audo.ai | Freemium/Subscription | One-click fixes for vocals in noisy environments | Less manual control; requires an internet connection |
| Professional Plugins | iZotope RX, Waves Clarity Vx | One-time purchase or Subscription | Difficult audio with complex, variable noise (traffic, reverb) | Can be expensive; has a steeper learning curve |
Ultimately, the goal is to find the most efficient path to clean audio for your specific workflow.
Making the Right Choice for Your Project
So, how do you decide? It really comes down to a few simple questions.
- Quick social media clips with a minor hum? Stick with your video editor’s built-in tools. They’re fast and more than good enough.
- Passion project on a budget with steady fan noise? Audacity is your best friend. It takes a few extra steps but delivers great results for free.
- Client work or a video with really distracting noise? An AI plugin or service is a must. The quality you get and the time you save make it a worthwhile investment.
No matter which tool you use, the goal is the same: get the background noise out of the way so your message can be heard loud and clear. Clean audio is also the perfect starting point for the next steps, like adding subtitles or creating an AI dub with a platform like TranslateMom, making your content accessible to everyone, everywhere.
Actionable Techniques for Removing Common Noises
Okay, you've figured out what kind of noise you're dealing with. Now it's time to roll up our sleeves and get to work. Effective video background noise removal isn't about hitting one magic button; it's about choosing the right tool for the job.
Let's break down the three most reliable methods you'll use time and time again.
This diagram gives you a quick visual of the typical workflow, showing how you might move from simple edits to more powerful, specialized tools.
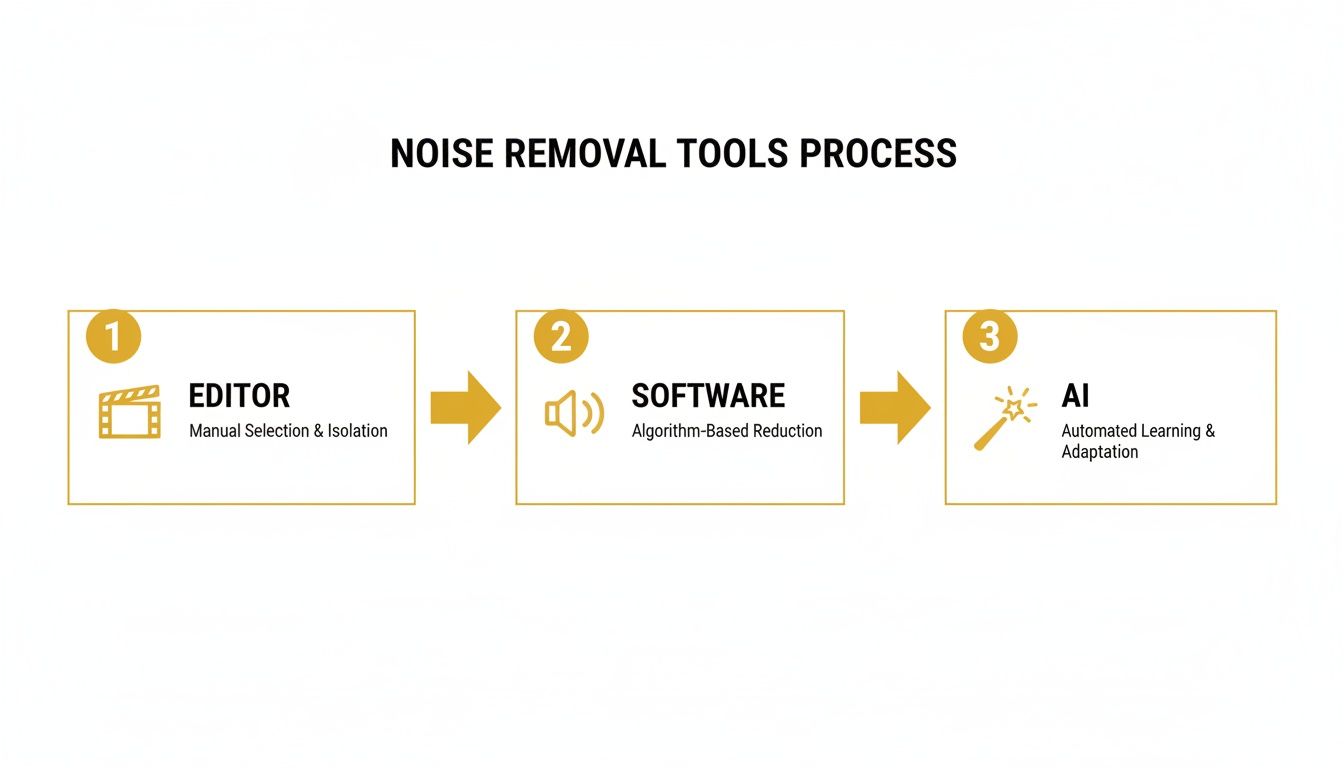
As you can see, the process often starts inside your video editor, moves to dedicated audio software for bigger problems, and can end with sophisticated AI for the toughest jobs.
Using a Noise Print for Constant Hum
The most common pest in audio is that constant, steady drone—an air conditioner humming, a fan whirring, or that low-level hiss from your gear. Because this sound is consistent, we can actually teach our software what it sounds like and then tell it to remove only that sound. This is called creating a "noise print" or "noise profile."
You'll find this feature in free editors like Audacity and, of course, in more advanced digital audio workstations. The process is pretty much the same everywhere.
- Isolate the Noise: Find a few seconds of your audio where it's just the background hum and nobody is talking. This is your sample.
- Capture the Print: Highlight that quiet section and use your software's noise reduction tool to "learn" or "get noise print." The software is analyzing the exact frequencies of that unwanted sound.
- Apply the Reduction: Now, select your entire audio track. Apply the effect, using the profile you just captured to guide the removal.
The two settings you'll want to watch are Reduction (dB) and Sensitivity. My advice? Start gently with the Reduction, maybe around 12 dB. If you crank it up too high, the voice will start to sound watery and metallic. The goal is subtlety—you want to push the noise down so it's no longer distracting, not completely obliterate it.
Applying a Noise Gate to Silence Pauses
A noise gate is a brilliantly simple tool. Think of it as a bouncer for your audio track. It only lets sound through when it's loud enough (like someone speaking) and slams the door shut when things get quiet. This is a fantastic way to clean up those silent gaps between sentences where low-level noise can creep in.
A gate doesn't remove the noise from the speech itself. What it does is create perfectly silent pauses, which makes the entire track feel much cleaner and more professional. It works wonders for interviews and podcasts with natural breaks in the conversation.
Here are the key settings to know:
- Threshold: This is the big one. It tells the gate when to open. You want to set it just above the level of your background noise but below the level of the quietest parts of the dialogue.
- Attack: This controls how quickly the gate opens. For speech, a fast attack is almost always what you want.
- Release: This sets how quickly the gate closes. A slightly slower release sounds more natural and keeps the gate from cutting off the very end of words.
A classic mistake is setting the threshold too high. This chops off the start of words and makes the audio sound clipped and unnatural. Always listen back carefully to make sure the dialogue flows smoothly.
Leveraging AI Denoisers for Complex Sounds
So what about sounds that aren't constant? A random dog bark, a passing siren, or keyboard clicks—you can't fix those with a simple noise print. This is where modern AI-powered denoisers absolutely shine.
Tools from companies like iZotope, CrumplePop, or services like Adobe Podcast have changed the game. They use machine learning models that have been trained on thousands of hours of audio to understand the difference between a human voice and pretty much everything else.
The workflow is usually dead simple. You just apply the AI plugin to your track and tweak a single "Strength" or "Amount" knob. The AI does all the complex work, intelligently separating the voice from the unpredictable noise. The results can be jaw-dropping, saving recordings that would have been completely unusable just a few years ago.
For creators using platforms like TranslateMom to subtitle or dub their content, this step is crucial. A clean audio track is the bedrock of accurate transcription. In TranslateMom, once you're in the Studio editor, you can access AI tools from the sidebar to rewrite captions, fix formatting, or summarize content, all of which work best with a noise-free source.
The real power of AI is its ability to preserve the natural quality of the voice. While older tools could leave vocals sounding thin and processed, AI denoisers are much better at maintaining the original richness and tone. This makes video background noise removal less of a compromise and more of a straightforward enhancement to get your project looking and sounding professional.
Integrating Clean Audio into Your Localization Workflow
So you've done the hard work and completely cleaned up your video's audio. What's next? For a lot of creators, the goal is localization—getting your content ready for a global audience with subtitles, translations, and dubbing.
This is where all that effort you put into video background noise removal really shines. Clean audio isn't just a nice-to-have for localization; it's absolutely essential.
Think of it this way: AI transcription and dubbing tools are incredibly smart, but they aren't miracle workers. They need clear, crisp voice data to do their job properly.
Trying to feed a noisy audio track into an AI is just asking for trouble. Any background hum, echo, or random sounds will completely throw off the algorithms. The result? A mess of misspelled words in your transcriptions, bizarre phrases in your translations, and clunky, badly-timed AI voiceovers. All the professionalism you just added gets washed away.
From Clean Audio to Global Content
To sidestep these issues, you need a smooth handoff from audio cleanup to localization. A tool like TranslateMom is built to be the final piece of the puzzle, turning your polished audio into perfectly localized content.
Here’s how simple the process is:
- Prep Your File: Once you've removed all the background noise, export your final video with the clean audio track.
- Upload to TranslateMom: In the New Task screen, you can just drag and drop your video file. Even quicker, you can paste a link directly from YouTube or another platform. You can even press
Fon your keyboard to open the file picker. - Pick Your Service: Tell the tool your video's Source Language and the Target Language you want. Then, just choose what you need: Transcription for captions, Translation for foreign language subtitles, or Dubbing for a complete AI voiceover.
Starting with a clean audio source is the single best thing you can do to get the most accurate results from the AI. It means fewer manual fixes, a much faster turnaround, and a final product that looks and sounds professional to your global audience.
Final Touches in the Studio Editor
After the AI works its magic, you'll land in the Studio Workspace. This is your command centre for perfecting the timing and style.
The visual Waveform is your best friend here. It lets you actually see the speech patterns from your clean audio.
You can drag the start and end points of each subtitle to line up perfectly with the dialogue, making sure they appear and disappear with precision. If you’re dubbing, this visual guide helps you match the pacing of the original speaker, which is key for a natural-sounding result. You can also use the Style tab to customize fonts, colors, and even add karaoke-style highlighting animations to your text.
This final step ensures that your message is not only understood but also professionally presented in any language. For a complete overview of taking your content global, you can learn more about how to translate videos with our detailed guide. Integrating noise removal into your localization process is the key to breaking language barriers effectively.
Going Deeper: Advanced Fixes and Rookie Mistakes
Once you've got the basics of video background noise removal down, you can start tackling the trickier stuff. Moving beyond simple hums means dealing with issues like room echo and specific resonant frequencies that can make your audio sound hollow or unprofessional.
Tackling Echo and Boominess
One of the most powerful tools for this is a good equalizer (EQ). Every room has a unique sound signature, and sometimes certain frequencies get amplified as they bounce around. This can create a muddy or "boomy" quality that clouds the speaker's voice. An EQ lets you surgically remove those problem frequencies without messing with the rest of the audio.
For echo, a dedicated de-reverb plugin is your best friend. These tools are smart enough to tell the difference between the direct sound of a voice and the reflections coming off the walls. By dialling back those reflections, you can make a recording from a cavernous room sound like it was captured in a much tighter, more intimate space.
Don't Make These Common Mistakes
Knowing what not to do is just as important as knowing what to do. I see so many creators get excited about cleaning their audio, only to accidentally make it sound worse. Steering clear of these pitfalls will save you a ton of headaches.
Here are the top three mistakes I see all the time:
- Going overboard with processing. This is the number one sin. It’s so tempting to crank that noise reduction dial to 100%, but this almost always introduces weird digital sounds, often called "artifacts." The voice can end up sounding thin, watery, or robotic.
- Using the wrong tool for the job. Trying to fix a sudden dog bark with a noise print tool designed for constant hum is like trying to hammer a nail with a screwdriver. It just won't work. Match the tool to the type of noise you're fighting.
- Forgetting to back up your original audio. Always, always, always work on a copy of your audio file. You never know when you'll make a mistake or just change your mind. Without a backup, there's no going back.
The goal isn't to create total, unnatural silence. It's to reduce the background noise enough that it no longer distracts the listener. A little bit of natural room tone is almost always better than a sterile, over-processed track.
This idea of maintaining good audio quality is more important than ever. In a great example of this, California recently extended its CALM Act to cover streaming services, showing that audio quality is a real consumer issue. The bill was partly inspired by parents complaining about loud ads waking up their babies! It's a powerful reminder of how important proper audio management is. You can read more about California's audio quality legislation on gov.ca.gov.
Primed and Ready for the Next Step
Once you've cleaned up your audio and dodged those common mistakes, you're left with a pristine track that's ready for anything.
For example, when you bring your video into a localization tool like TranslateMom, that clean audio is the key to getting super-accurate captions and dubs. Inside the Studio editor, you can then fine-tune the timing with the visual waveform or even toggle a Split View to see your original and translated text side-by-side for easy reference. Taking these extra steps ensures your final product sounds polished, professional, and ready for a global audience.
Common Questions About Cleaning Up Audio
Here are a few of the questions that pop up most often when people start tackling background noise.
Can I Really Get Rid of Background Noise for Free?
You absolutely can. For those constant, nagging sounds like an air conditioner hum or the buzz from your gear, free tools like Audacity do a surprisingly great job. You can make a massive difference without opening your wallet.
That said, if you're dealing with trickier problems like random background chatter or a bad room echo, the paid plugins are almost always worth it. They tend to give you a much cleaner, more natural sound without the weird digital artifacts.
Is Denoising Going to Make My Voice Sound Weird?
It definitely can, but only if you get too heavy-handed with it. This is probably the number one mistake I see people make—they crank the noise reduction up way too high. The result? A thin, watery, or robotic-sounding voice that's almost as distracting as the original noise.
The trick is to be gentle. Your goal isn't to create a perfectly silent, sterile track. It's to reduce the noise just enough so that it's not distracting anymore. Always A/B test your changes and listen closely to how your adjustments are affecting the actual voice quality.
Should I Clean Up the Audio Before or After Editing the Video?
For the best and most consistent results, always clean your audio before you start chopping up your video clips.
When you work on the raw, full-length audio files first, you get a uniform sound across the entire recording. This saves you a massive headache later, preventing you from having to apply and tweak the same effects on dozens of tiny, separate clips in your video timeline. It's a simple workflow change that makes a huge difference.
Ready to take your polished audio global? With TranslateMom, you can add subtitles, translate your content, and create dubs in minutes. Give it a try and see how simple localization can be.