Forget the myth that you need a pile of expensive studio gear for great sound. Your iPhone is a surprisingly powerful audio recorder, perfect for everything from podcast interviews and musical sketches to creating high-quality social media content. This guide will show you exactly how to unlock professional-grade results.
Your iPhone Is a Professional Recording Studio
The device in your pocket is more than capable of capturing crystal-clear audio. The secret isn't fancy equipment—it's understanding and following a simple, repeatable process.
Success really just boils down to four key pillars: picking the right app, dialing in the perfect settings, knowing when to use an external microphone, and mastering some basic cleanup techniques.
This approach transforms your iPhone from just a phone into a reliable field recorder for any project you can dream up. Whether you're a student capturing a lecture, a journalist out in the field, or a creator producing a polished podcast, these foundational steps ensure your audio is clean, clear, and professional.
The Four Pillars of iPhone Audio
When you nail this workflow, you'll have the confidence to capture excellent audio in almost any scenario. It’s a systematic way to guarantee quality from start to finish. For those looking to take things even further, you might find some great insights into setting up a recording studio to optimize your space.
This simple flow breaks down the four essential stages for great iPhone audio, from choosing your app to the final polish.
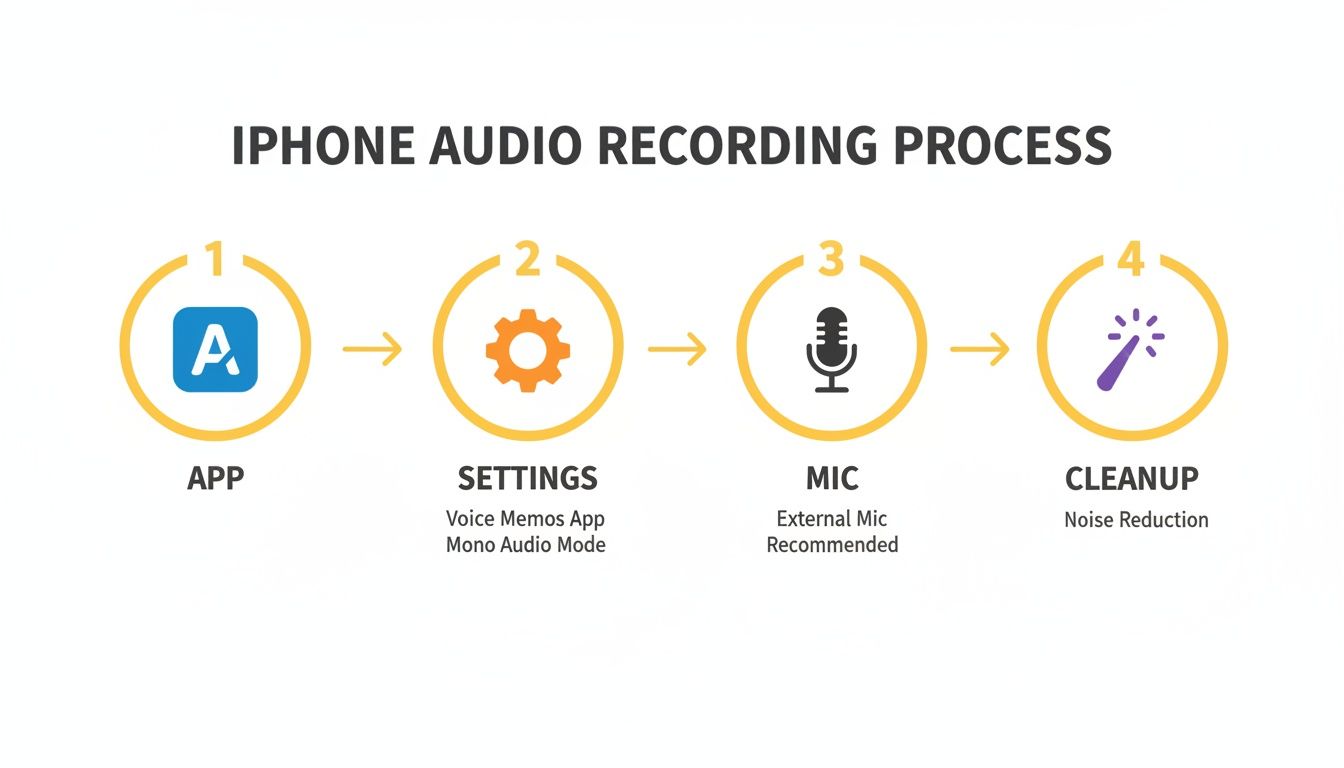
It’s a good reminder that great sound comes from deliberate choices at each step, not just from hitting the record button and hoping for the best.
Preparing Your Audio for a Global Audience
Once your recording is done, the work isn't quite over—especially if you want to reach a wider audience. A clean audio file is the perfect launching pad for making your content accessible to people all over the world. This is where tools built for transcription and localization really shine.
By capturing high-quality source audio, you dramatically improve the accuracy of automated transcription services. A clean recording means fewer errors for an AI to correct, saving you significant editing time later.
For example, once you have your final audio file, you can upload it directly into a platform like TranslateMom. On the New Task screen, you can drag and drop your file (or press F for a keyboard shortcut to the file picker), select the source language, and choose the Transcription service. This quickly turns your spoken words into an accurate, editable script—the essential foundation for adding subtitles or creating translated dubs for viewers worldwide.
Choosing the Right App and Audio Settings
Your iPhone's hardware is surprisingly powerful, but the app you use is your control room. It dictates everything from how you capture audio to what you can do with it afterwards. For many people, the best tool is the one that's already in their pocket.

The built-in Voice Memos app is fantastic for quick, clean captures. Think interviews, lectures, or just getting a fleeting idea down. It's simple, reliable, and even lets you organize recordings into folders to keep things tidy.
But there's one crucial setting you absolutely need to change before you hit record on anything important.
Pro Tip: Dive into your iPhone's Settings > Voice Memos > Audio Quality and switch it from the default "Compressed" to "Lossless." This makes the file bigger, sure, but it preserves every single detail of the original sound. For any serious editing or professional work, this is non-negotiable.
The iPhone's role in content creation is massive. By 2025, it's estimated that nearly 65% of US consumers aged 12 and up will use an iPhone as their main listening device. This is especially true in the podcasting world, which now accounts for 31% of all spoken-word audio listening. As Apple continues to enhance its native apps, the iPhone solidifies its spot as a go-to recording device.
When to Upgrade to a Third-Party App
Voice Memos is a great starting point, but specialized apps can give you a whole new level of control and polish. The right app for you really just depends on what you're trying to create.
Here are a few of my favourites that I recommend for different situations:
- Dolby On: This is a lifesaver for creators who need smart noise reduction on the fly. It automatically cleans up background hum and boosts clarity, making it perfect for vlogging or recording in noisy environments.
- Ferrite Recording Studio: If you're building a podcast or a layered audio story, Ferrite is your new best friend. It’s a pocket-sized multi-track editor that lets you layer voice, music, and sound effects just like you would on a desktop.
- ShurePlus MOTIV: For anyone using an external microphone from Shure, this app is a must-have. It gives you precise control over mic gain, EQ, and compression, letting you shape the sound at the source for a truly professional result.
Comparing Your Options
Choosing an app isn't about finding the single "best" one—it's about finding the best one for the job. A student recording a lecture has completely different needs than a musician layering guitar tracks.
To make the decision a bit easier, here’s a quick breakdown of how these apps stack up against each other.
| Feature | Voice Memos | Dolby On | Ferrite Recording Studio |
|---|---|---|---|
| Best For | Quick captures, interviews, notes | Vlogging, field recording, instant enhancement | Podcasting, multi-track projects, detailed editing |
| Ease of Use | Extremely simple, one-tap recording | Very user-friendly, automatic processing | Steeper learning curve, feature-rich interface |
| Key Feature | Lossless quality, iCloud sync | AI-powered noise reduction & mastering | Full multi-track editing |
| Editing Capabilities | Basic trimming | Trimming, EQ, noise reduction presets | Advanced editing, fading, automation |
| Cost | Free | Free (with optional in-app purchases) | Free (with a Pro upgrade for advanced features) |
Ultimately, your workflow dictates the app. Voice Memos is the reliable workhorse for simple, high-quality capture. Dolby On is the smart solution when you need instant polish. And Ferrite brings the power of a studio to your fingertips for more complex projects.
For example, once you've recorded a lecture with Voice Memos, you might need a transcript. Knowing how to convert that audio is the next step, and our guide on voice-to-text on iPhone breaks down that entire process. Choose the tool that best fits your final vision.
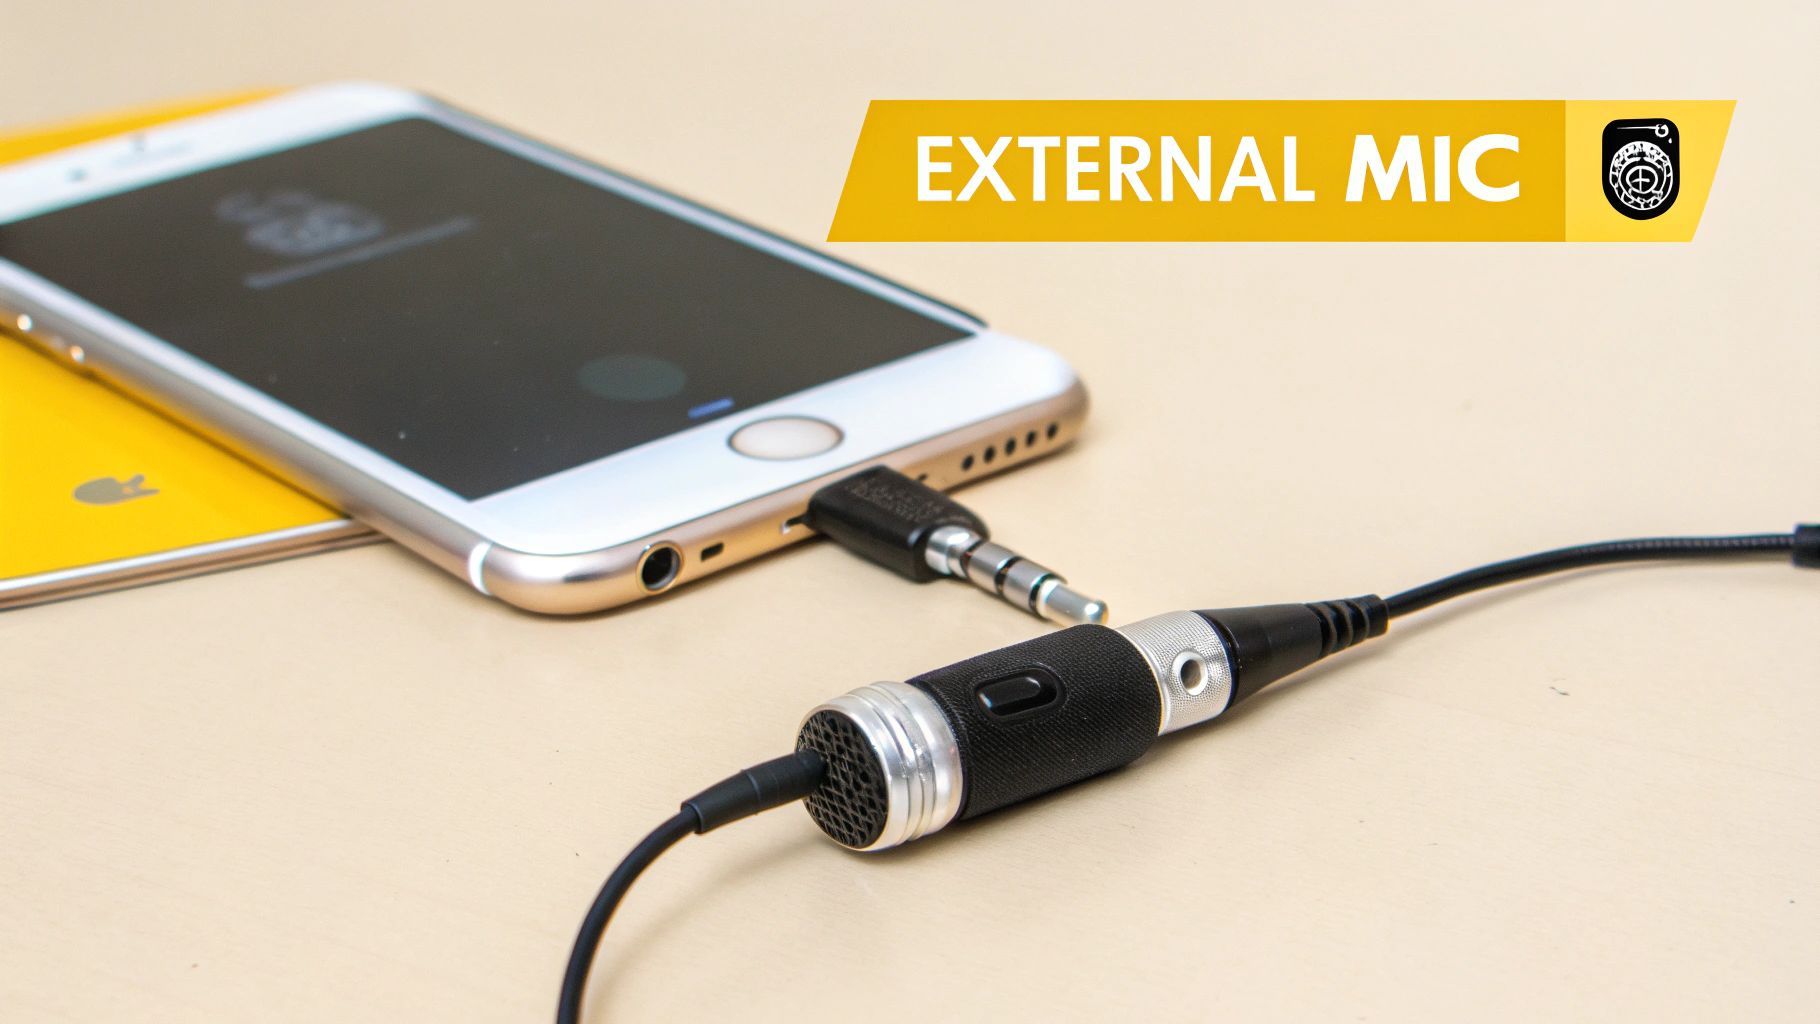
Upgrading Your Sound with an External Microphone
Look, the iPhone’s built-in mic is decent for what it is. It's surprisingly capable in a pinch. But if you're serious about your audio, the single biggest leap in quality you can make is getting an external microphone.
Why? It's all about proximity. An external mic gets you closer to the sound source, which means it captures more detail and way less of that distracting room echo and background hum. It's the fastest path to that crisp, professional sound you hear on podcasts and broadcasts.
Picking a microphone can feel a bit overwhelming, but it's simpler than you think. There isn’t one "perfect" mic for everything. It’s about choosing the right tool for what you’re trying to do.
Plug-and-Play Simplicity
For anyone who just wants to get going without a fuss, plug-and-play microphones are a lifesaver. These connect directly to your iPhone’s Lightning or USB-C port, draw power from the phone, and just work.
You literally plug it in, open your app, and you're recording. This simple step gives you a huge quality boost, making these mics perfect for podcasters, musicians sketching out ideas, or anyone needing better sound for voiceovers and video calls.
Lavalier Mics for Discreet Audio
A lavalier microphone—often called a lapel mic—is that tiny microphone you see clipped onto someone's shirt. They're the go-to for interviews, vlogging, and presentations for a good reason. By staying in one spot on the speaker's chest, they deliver consistent audio levels, even if the person turns their head.
Wireless lav systems take this a step further, giving you the freedom to move around without being physically tethered to your iPhone. They're a game-changer for dynamic video shoots.
Placement is Everything: When using a lavalier, clip it to a sturdy bit of clothing on the upper chest, about 6-8 inches from your chin. Make sure fabric can't rustle against it. Always do a quick test recording—turn your head, move a bit—to catch any noise issues before you hit record on the real thing.
Shotgun Mics for Focused Recording
Think of a shotgun microphone like a sonic spotlight. It's highly directional, designed to grab sound from whatever it's pointing at while ignoring noise from the sides and back. This makes it incredible for isolating a single voice or sound in a busy environment.
You'll often see shotgun mics mounted on a tripod or camera rig, aimed squarely at the subject. They are essential kit for filmmakers, journalists doing on-the-street interviews, or anyone trying to capture a specific sound without all the ambient chatter.
Finding the Vocal Sweet Spot
No matter what mic you use, where you place it is absolutely critical for clean vocals. You're trying to find that "sweet spot" to dodge two very common audio gremlins: plosives and sibilance.
- Plosives: That ugly pop of air you get from 'p' and 'b' sounds. The fix is simple: don't speak directly into the mic. Position it slightly off to the side of your mouth.
- Sibilance: The harsh hissing sound from 's' and 'sh' words. If you're hearing a lot of hiss, try moving the mic a little farther away. This can soften the effect without making you sound distant.
A great starting point is about 6-10 inches from your mouth. From there, pop on your headphones and make small adjustments until it sounds just right.
Preparing Your Mic'd Audio for the Next Step
Once you've nailed the recording and have that crystal-clear audio file, you're ready for the next step. Often, that means getting it transcribed or translated to share with a wider audience. Great source audio makes this part of the process a breeze.
For instance, after recording an interview, you can upload that clean audio file directly to a platform for localization.
With a tool like TranslateMom, the workflow is dead simple:
- Head to the New Task screen (pro-tip: just press
Ffor a quick file upload). - Drag and drop your audio or video file right into the browser.
- Set the Source Language (the language spoken in your recording).
- Choose the Transcription service to get a precise, time-coded script.
From there, you're in the driver's seat. In the Studio Workspace, you can polish the text, use the Style tab to create slick-looking captions with karaoke-style animations, or hit Translate to generate subtitles in other languages. It all starts with capturing excellent audio—get that right, and everything that follows is faster and looks far more professional.
How to Capture Clean Audio in Any Environment
The hallmark of professional audio isn't what you hear—it's what you don't hear. Background noise is the ultimate enemy of a clean recording, but you can get pristine sound almost anywhere with a few simple tricks. Your iPhone is a surprisingly powerful field recorder, but its microphone is designed to pick up everything, from the hum of your fridge to a car driving by outside.
The real secret is to get your environment under control before you even think about hitting record. Start thinking like a sound engineer by listening—really listening—to the space around you. All those little sounds you normally tune out can become major distractions in a recording.
Scout and Secure Your Location
Before you set up any gear, just stand still for a minute and listen. Seriously. This one small step can save you hours of headaches in the editing room. Your mission is to find and shut down any potential noise sources.
Here are a few common culprits to listen for:
- HVAC Systems: Air conditioners and heaters create a constant, low rumble that's a nightmare to remove cleanly. If you can, switch them off for your recording session.
- Appliances: Refrigerators, freezers, and even the fan on your laptop can add a ton of unwanted noise. Unplug them or simply move to a room farther away.
- External Noise: Pay attention to traffic, construction, barking dogs, or planes flying overhead. Sometimes, just closing a window does the trick. Other times, you might need to plan your recording for a quieter part of the day.
The best recording spots are often the most unlikely ones. A walk-in closet packed with clothes is a DIY recordist's dream. All that soft fabric does an amazing job of absorbing sound waves, killing echo and giving you a tight, focused vocal sound for free.
This makeshift approach is surprisingly effective. You can also hang thick blankets or duvets on the walls to mimic professional acoustic treatment. The goal is to create a "dead" space where the microphone only hears your voice.
The Power of Real-Time Monitoring
If you take away just one tip, make it this one: monitor your audio in real-time. This just means wearing headphones while you record, plugged directly into your mic or audio interface. It is the only way to know exactly what your iPhone is picking up.
Monitoring helps you catch problems you’d otherwise miss completely:
- Wind Noise: Even a tiny breeze can create a deep, rumbling sound.
- Digital Clipping: That nasty, distorted sound you get when the audio is too loud. Once it's there, it's impossible to fix.
- Interference: Weird clicks, pops, or buzzing from nearby electronics.
- Clothing Rustle: The subtle scraping of a lavalier mic against a shirt.
This single habit is what separates amateur audio recording with iphone from a professional-sounding track. And for those times when noise is unavoidable, our guide on how to remove background noise from audio can help you clean things up later.
The rise of mobile content creation, particularly in places like California, is all thanks to this accessibility. The podcasting industry there reflects a national trend, with a projected 15% climb over five years to 2025. This boom is powered by the incredible quality of iPhone mics and the apps available, with podcasts now making up 31% of all spoken-word listening time. You can find more stats on digital audio listener demographics on emarketer.com.
Polishing Your Audio and Preparing It for the World
Capturing great audio is a huge win, but the job isn't quite done. A little bit of post-production polish can take your recording from good to genuinely professional. The best part? You can handle the most important cleanup right on your iPhone, no fancy desktop software needed.

The first, easiest, and most impactful edit you can make is trimming the "dead air" from the beginning and end of your track. It's a simple move that instantly makes your recording sound tighter and more intentional. Most apps, including Apple's own Voice Memos, have a basic trim function that lets you drag handles to chop off any unwanted silence.
From a Raw File to a Global-Ready Product
Once you have a clean audio file, you're ready to take it global. This is where preparing your audio for localization comes in—transforming your content so it can be understood and enjoyed by people everywhere. This journey almost always starts with transcription: turning your spoken words into text.
A high-quality audio file (like the lossless WAV or clean MP4 we talked about earlier) is your best friend here. The clearer your source audio, the more accurate the transcription will be, which will save you a massive amount of editing time down the line.
This is where a specialized tool like TranslateMom really shines. The whole workflow is designed to be fast and painless, letting you go from raw audio to a finished, editable script in just a few minutes.
- Kick off a New Task: On the main screen, you can just drag and drop your final audio file right into the browser. If you're working with a video, you can import a link from platforms like YouTube or TikTok. Pro tip: Pressing
Fon your keyboard is a handy shortcut to open the file picker instantly. - Pick Your Service: First, select the language spoken in your recording as the Source Language. Then, choose the Transcription service to get an accurate text version. If you need subtitles in another language, select Translation instead.
Think of this initial transcription as the foundation for everything that comes next. With an accurate text version of your audio, you can easily add captions for accessibility, translate subtitles for new markets, or even generate AI-dubbed audio tracks in different languages.
The Power of an All-in-One Studio
Once your audio is transcribed, you land in an integrated editing environment. Inside the TranslateMom Studio Workspace, you can fine-tune every single word and timestamp. The audio waveform is laid out visually, letting you drag the start and end points of each subtitle to perfectly sync them with the speech in your recording.
From there, you have total creative control. Hop over to the Style tab to customize your captions with different fonts, colours, and even cool karaoke-style animations that highlight words as they're spoken. You can even upload and position a brand logo directly onto your video.
And if you decide you want to reach a new audience? A single click on the Translate tab can re-run the whole process for a different language. If you want to dive deeper into this, you can learn about the best audio translation tools available in 2025.
While on-the-go editing is incredibly powerful, some pros might still turn to desktop software for heavy-duty audio work—check out a review of Descript for audio editing if you're curious. But honestly, for most creators, a streamlined, browser-based workflow is more than enough to get your iPhone recordings ready for the world stage.
iPhone Audio Export Checklist
Before you hit "send" or "upload," run through this quick checklist. It ensures your file is perfectly prepped for any platform or professional service, like transcription or dubbing.
| Check | Action | Why It's Important |
|---|---|---|
| Final Trim | Remove any dead air or false starts at the beginning and end. | Creates a clean, professional-sounding file that's ready to go. |
| Format Check | Export as WAV for quality or MP4/M4A for compatibility. | WAV preserves maximum quality for editing; MP4/M4A is great for sharing. |
| File Naming | Use a clear, descriptive name (e.g., ProjectName_Interview_Final.wav). |
Avoids confusion and makes files easy to find and organize later. |
| Listen Through | Do one final, uninterrupted listen from start to finish. | Catches any glitches, background noises, or mistakes you might have missed. |
| Metadata | If possible, add artist/project/episode info in the app's export settings. | Helps platforms and software correctly categorize and display your audio. |
Following these simple steps will make a huge difference, ensuring the hard work you put into recording doesn't go to waste during the final handoff.
Getting the Green Light: A Quick Guide to Recording Consent
Before you even think about hitting that red record button, we need to talk about something crucial: the law. It’s so easy to grab your iPhone and start recording, but forgetting about consent can land you in some serious hot water. This isn’t just about covering your bases legally; it's about being ethical and respecting people's privacy.
At the heart of it all is one simple concept: permission. The rules change depending on where you are, but they generally fall into two buckets.
One-Party vs. All-Party Consent: What's the Difference?
The laws around recording conversations can get tricky, and they depend entirely on the physical location of everyone involved. As the person doing the recording, it's on you to know the rules.
One-Party Consent: In these places, you only need one person in the conversation to agree to the recording. Good news—if you're part of the chat, you can be that one person. Federal law in Canada, for instance, generally works on a one-party consent model.
All-Party Consent: This is the one you really need to watch out for. In these areas, you need explicit permission from every single person on the recording. No exceptions.
Here’s the kicker: the location of every participant matters. If you’re in a one-party province but you’re interviewing someone in an all-party state, you have to follow the stricter, all-party rule. It gets complicated, fast.
My advice? Just pretend you're always in an all-party consent jurisdiction. It's the safest, simplest way to operate. Always announce you're recording and get a clear "yes" from everyone. It protects you, respects them, and keeps your work ethically sound.
A Real-World Example: California's Strict Rules
Some places don't mess around. Take California, for example. Their California Invasion of Privacy Act (CIPA) demands that everyone consents to the recording of any "confidential communication."
This law doesn't just apply if you live there; it applies if you're recording anyone who is physically in California at the time. Breaking this law can lead to massive fines or even felony charges. It’s the reason you always hear that "This call may be monitored or recorded for quality assurance" message when you call a customer service line. You can dive deeper into these phone call recording laws on soundcore.com.
How to Get and Document Consent (The Easy Way)
Getting consent doesn’t have to be some awkward, formal process. You just need to create a clear record that everyone was on board.
The best trick I've learned is to build it right into the start of my recording. Before jumping into the main topic, I just say:
"Hey everyone, just to confirm for the recording, are you all okay with this conversation being recorded?"
Then, I wait for each person to give me a clear, verbal "yes." It takes two seconds, but it creates a permanent, undeniable record of consent right at the top of your audio file. It’s a tiny step that saves you from a world of potential trouble.
Still Have Questions?
Even with a solid plan, you're bound to run into a few specific quirks when recording audio on your iPhone. Let's tackle some of the most common questions that pop up.
How Can I Cut Down on Background Noise When I’m Recording?
The best defence is a good offence. Before you even hit record, find a quiet space. A room with soft furnishings like carpets, curtains, or even a walk-in closet is fantastic because the fabric soaks up echo and reverb. Then, get your microphone as close as you can to your sound source. Proximity is your best friend.
Recording outside? A foam windscreen or a furry "deadcat" cover for your external mic is an absolute must-have. It’s the only way to combat wind noise. If you still catch some unwanted sound, an app like Dolby On can do some automatic cleanup in a pinch. For serious work, you’ll want to export the file and clean it up on a desktop.
What’s the Best Audio Format to Record In?
If quality is your main goal, you should always be recording in a lossless format. It’s a quick change on your iPhone.
Just head over to Settings > Voice Memos > Audio Quality and tap on Lossless.
This creates a bigger file, but it’s worth it. You’re capturing every single bit of audio data without any compression, which is essential if you plan on doing any professional editing, mixing, or mastering later. For quick voice notes where file size matters more, the default "Compressed" setting will do the job.
Can I Actually Connect a Professional XLR Microphone?
You bet. You just need one extra piece of kit: an audio interface. Think of it as a small bridge that connects your pro gear to your iPhone.
A compact interface plugs into your iPhone’s Lightning or USB-C port and gives you the standard XLR input your studio microphone needs. This setup is a game-changer. Not only can you use top-tier mics, but you also get proper control over your input level (gain) and can monitor your audio in real-time with headphones. It effectively turns your iPhone into a pro-level portable recording rig.
Ready to take your pristine audio global? With TranslateMom, you can upload your iPhone recordings and get back accurate transcripts, stylish captions, and even AI-dubbed audio in dozens of languages. It's the perfect next step for your content. Give your first project a try for free at https://www.translate.mom.
