When you need to add subtitles to a video, you've got a few ways to tackle it. You could use an AI-powered tool for a quick and easy job, get hands-on with a professional video editor for total control, or just use the built-in features on platforms like YouTube.
Honestly, the fastest route is letting an AI service transcribe and sync the text for you. It's not perfect, but it gets you about 95% of the way there in just a few minutes.
Why Adding Subtitles to Videos Is a No-Brainer

If your videos don't have text, you're basically leaving a huge chunk of your audience out in the cold. Subtitles started as an accessibility feature, but now they're just a flat-out essential for anyone serious about digital video. While they are still absolutely critical for viewers who are deaf or hard of hearing, their impact now reaches much, much further.
Reaching People in a Sound-Off World
Think about how people actually watch videos these days. They're on the bus, in a quiet office, or just scrolling through their feed late at night. Studies have shown that up to 85% of social media users watch videos with the sound off.
Without subtitles, your message is completely lost in those moments. Captions make sure your content still hits home, whether the audio is on or not.
On top of that, subtitles are a massive boost for your SEO. Search engines can't listen to your video, but they can read the text in your captions. Every word you say becomes a keyword that Google can crawl, making your video way more discoverable. This trend is only growing; in California alone, demand for captioning and subtitling services jumped by 38% in just three years.
Look at it this way: by skipping subtitles, you're making your content invisible to a massive audience and throwing away a huge SEO opportunity that could bring you traffic for years to come.
Choosing Your Subtitling Workflow
So, how do you actually get it done? It really boils down to two main paths:
- The AI-Powered Approach: This is all about speed and convenience. AI tools automatically transcribe your audio and time the captions for you. It's a lifesaver for social media content, tutorials, and internal videos where you need to move fast.
- The Manual Method: This means getting into your editing software and doing it all by hand—typing every line and syncing it perfectly. It takes time, but it gives you total precision, which is why it's the standard for professional film, broadcast, and high-end commercial work.
We're going to dive into both methods so you can figure out what works best for your project. For a deeper look at the whole process from start to finish, check out this complete guide on how to add subtitles to videos.
The Automated AI Approach to Subtitling
If you need to get subtitles on a video and time isn't on your side, AI is your new best friend. Seriously. The days of painstakingly typing out every single word and wrestling with timestamps are over. Modern AI tools can spit out a remarkably accurate draft of your subtitles in a tiny fraction of the time it would take to do it by hand.
This method is all about speed. It’s a perfect fit for social media creators, educators, or businesses that need to push content out quickly without letting quality slide. Instead of blocking out hours for transcription, you can have a nearly-finished subtitle file ready in just minutes.
This isn't just a niche trick anymore. A 2024 survey found that a whopping 68% of video production houses in California now use AI for their subtitling. They've managed to cut the time needed from four hours down to just 30 minutes for every hour of video.
How AI Subtitling Works
The process itself is refreshingly simple. You just give the AI your video, and its speech-to-text engine kicks into gear. It listens to the dialogue, turns it into text, and automatically creates the timestamps to sync every line perfectly with the spoken words.
Tools like TranslateMom make this whole thing a matter of a few clicks. You can kick off a new task by dragging and dropping your video file (up to 5GB) or just pasting a link from places like YouTube, Twitter (X), or TikTok.
As you can see, you start with a simple choice: upload or import from a link. This easy entry point means anyone can get started right away, no technical wizardry required.
Once your video is in the system, you just tell the tool what language is being spoken and select the "Transcription" service. The AI does its thing and then hands you a complete draft of your captions. It handles all the grunt work, freeing you up to focus on the final polish. If you want to get deeper into this, our guide on how to transcribe videos has even more detail.
The Importance of Human Review
Now, while AI is incredibly good, it's not perfect. It can stumble over unique names, industry-specific jargon, or words that sound similar but mean different things. That's why the final, non-negotiable step in any AI workflow is a quick once-over by a human.
Think of the AI as your incredibly fast assistant. It does 95% of the heavy lifting, but it relies on you to make the final polish. A quick read-through to correct names, fix punctuation, and ensure the tone is right is all it takes to elevate an good AI draft into a professional-quality final product.
That human touch provides the accuracy and context that machines can still miss. To really level up your workflow, it's worth checking out resources on the best AI captions app to see what other advanced tools can do. By blending AI's raw speed with your human oversight, you hit that perfect sweet spot of efficiency and precision for just about any video project you can throw at it.
All theory, no action? Let's fix that. I'm going to walk you through exactly how a dedicated subtitling tool can take a raw video and turn it into a perfectly captioned final cut in just a few minutes. We'll use TranslateMom as our example, a platform built to blend AI speed with the hands-on control you need for a polished result.
The core philosophy is simple: let the AI handle the grunt work so you can focus on the creative details.
The entire process boils down to three main phases: upload your video, let the AI generate a first draft of the subtitles, and then jump in to review and refine it.
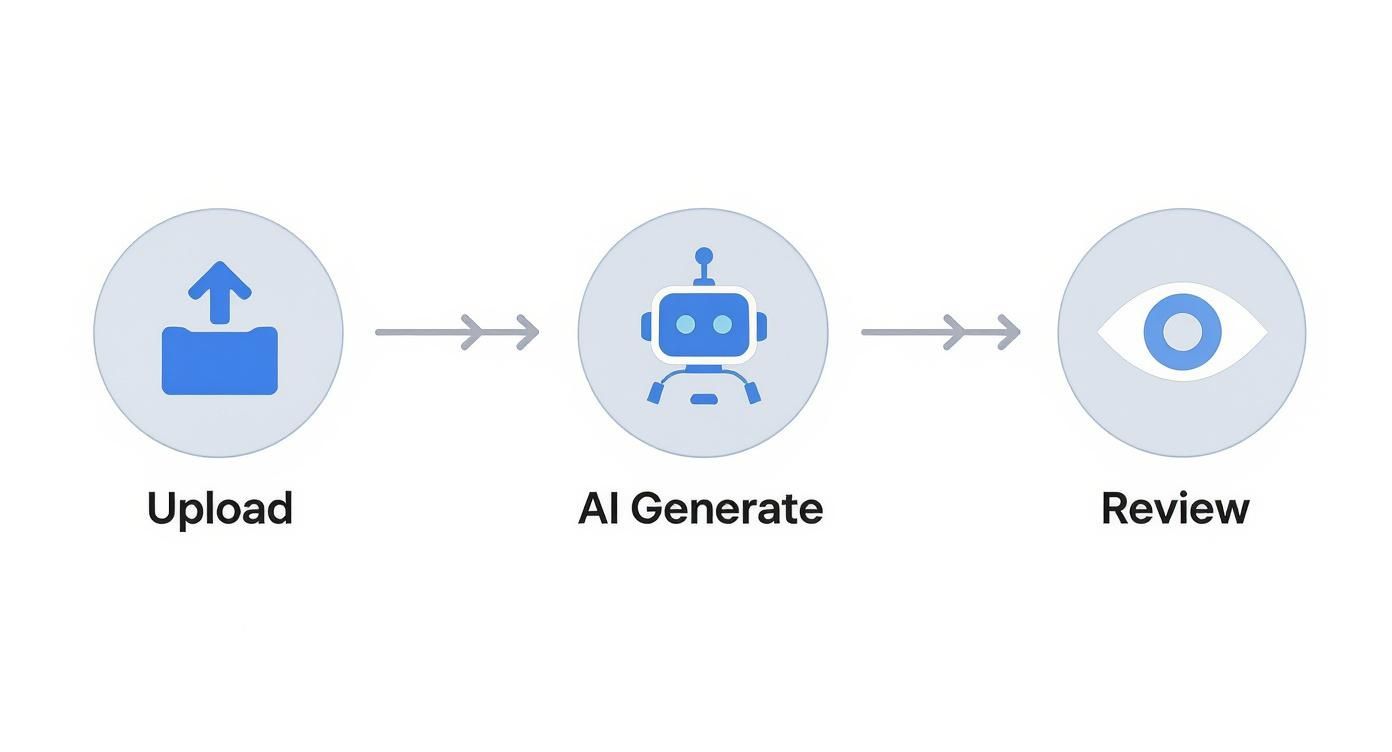
This upload-generate-review workflow is what makes modern subtitling so efficient. It transforms a task that used to take hours into something you can knock out in a single sitting.
Getting Your Video into the System
First things first, you need to get your video into the app. From the "New Task" screen, you have a couple of super simple options:
- File Upload: Got the file on your computer? Just drag and drop it right into the browser. It handles big files too, up to 5GB.
- Link Import: If your video is already online, just grab the URL. You can paste in a link from YouTube, Twitter (X), TikTok, or Instagram, and the platform will pull the video in for you.
Once it's loaded, you just tell it what language is spoken in the video and select "Transcription." This tells the AI to generate same-language subtitles. You can also choose "Translation" to generate subtitles in a new language or "Dubbing" for a new AI audio track.
Fine-Tuning in the Studio Workspace
After the AI works its magic, you'll land in the "Studio." This is your command centre, an editor designed for making precise adjustments.
See a word you want to change? Just click on that subtitle line and start typing. The video player even pauses automatically while you edit, so you won't lose your place. It's a small detail, but it makes a huge difference.
For timing, you'll see a visual audio waveform right under the text. This is a game-changer. You can literally see where the dialogue starts and stops, making it incredibly easy to drag the edges of a subtitle to match the audio perfectly. It's also great for getting rid of captions during long pauses or "dead air."
The real power of this workflow is how it combines AI speed with human precision. The AI does about 90% of the heavy lifting, but the editor gives you the final say on every word and every millisecond of timing.
Customizing the Look and Feel
Getting the words right is one thing, but making them look good is just as important. The "Style" tab is where you control the aesthetics.
You can tweak pretty much everything:
- Font family, size, and colour
- Text outlines and shadows for pop
- Background opacity to ensure readability
This is also where you can add those slick, karaoke-style animations that highlight words as they're spoken. They're a massive engagement booster for social media shorts. Need to add your logo? The "Brand" tab lets you upload a custom logo, resize it, and stick it anywhere on the video frame.
Once you’re happy with everything, you’ve got two ways to get your video out. You can "burn-in" the subtitles—which bakes them permanently onto the video—or you can download a separate subtitle file (like an SRT or VTT) to use in another video editor.
To help you get a clearer picture of the workflow, here's a quick reference table.
TranslateMom Feature and Workflow Quick Reference
| Feature | How to Use It | Best For |
|---|---|---|
| Video Import | Drag-and-drop a file or paste a URL from YouTube, TikTok, or X. | Quickly getting content into the editor without extra steps. |
| AI Transcription | Select the video's original language and choose "Transcription." | Generating a fast, accurate first draft of same-language subtitles. |
| Text Editor | Click directly on any subtitle line in the Studio to type and edit. | Correcting typos, punctuation, and phrasing for clarity and accuracy. |
| Waveform Timing | In the Studio, drag the start/end points of a subtitle on the audio waveform. | Nudging captions to perfectly align with spoken words for professional timing. |
| Style Customization | Use the "Style" tab to change fonts, colours, backgrounds, and add animations. | Creating visually appealing, on-brand subtitles that are easy to read. |
| Export Options | Choose to "burn-in" subtitles to the video or download an SRT/VTT file. | Creating a final video for direct sharing or getting a subtitle file for other platforms. |
This table covers the core functions you'll use to go from a plain video to a fully subtitled one, all within a single, streamlined interface.
Mastering Manual Subtitles in Pro Video Editors
AI is a massive time-saver, no doubt. But for those high-stakes projects—think broadcast television, high-end commercial work, or a feature film—you need absolute, frame-perfect precision. This is where rolling up your sleeves and captioning manually in a professional editor remains the gold standard.
It’s a much more deliberate process, giving you complete authority over every single detail.
Instead of an algorithm doing the heavy lifting, you’re in the driver’s seat. You become the transcriptionist and the timer, typing out every line of dialogue and meticulously syncing it to the speaker's audio. It takes more time, but the trade-off is total creative control.
Adding Subtitles in Adobe Premiere Pro
Thankfully, Adobe Premiere Pro has some seriously robust tools baked right in. You won’t need to hunt for external plugins; everything you need for professional-grade captioning is already there.
Your starting point is the Text panel. Head over to the Captions tab and you'll see an option to "Create new caption track." Clicking this adds a dedicated caption layer to your timeline, ready for you to start working. From there, it's a matter of adding your caption segments, typing in the dialogue, and dragging the in-and-out points until they match the audio perfectly.
Here’s a look at the Premiere Pro interface. You can see the caption track sitting neatly on the timeline, with the text editor panel ready for input.
Notice how each caption is a visual block on the timeline? This lets you line them up precisely with the audio waveforms for dead-on synchronization.
Manual Captioning in Final Cut Pro
The workflow in Final Cut Pro is pretty similar. It’s all about adding caption roles to your clips. Just select the clip or a specific section of your timeline you want to caption, then go to Edit > Captions > Add Caption. Pro tip: the keyboard shortcut Option-C will become your best friend.
This creates a new caption clip right on your timeline where you can type your text. Just like in Premiere, you can then drag the edges of the clip to adjust its length, getting that sync just right. Final Cut Pro’s magnetic timeline is also a huge help here, as it can help snap your captions neatly into place.
The key takeaway for both platforms is this: manual subtitling is a craft. It’s about more than just getting the words right; it’s about controlling the rhythm and pacing of how the viewer receives information, ensuring a seamless and professional experience.
Best Practices for Manual Work
No matter which software you’re using, a few core principles will make your work shine.
- Keep it readable. Stick to a character limit of around 42 characters per line. This prevents your viewer from having to read a novel at the bottom of the screen.
- Break sentences logically. Don't just chop a long sentence in half. Find a natural pause or break in the thought to create a new caption. Awkward splits are jarring for the viewer.
- Style for clarity. Use the built-in styling tools to tweak the font, size, and background. You want your text to have high contrast so it’s easy to read against any background in your video.
This method definitely requires more patience, but for those projects where every little detail counts, the flawless result is always worth the extra effort.
Best Practices for Professional-Quality Subtitles

Knowing the technical steps to add subtitles is just the start. The real skill lies in creating subtitles that feel completely seamless, enhancing the video without ever pulling focus.
Good subtitles are invisible. They just work. Bad subtitles, on the other hand, are a constant distraction and can easily frustrate your audience enough to make them click away.
The number one goal is always readability. Stick with a simple, clean, sans-serif font like Arial or Helvetica that’s easy on the eyes, no matter the screen size. You also need strong contrast. If your text is blending into the background, it’s useless. A semi-transparent black background box or a subtle outline around the text can make a world of difference, especially over busy or bright scenes.
Subtitles vs. Captions: What's the Difference?
People throw these terms around interchangeably, but they serve slightly different purposes. Getting it right makes your content more inclusive.
- Subtitles are for viewers who can hear the audio but don't understand the language. They only translate spoken dialogue.
- Captions (or Closed Captions) are for viewers who can't hear the audio at all. They cover all important audio cues—dialogue, sound effects like
[door closes], and non-verbal cues like[tense music].
For true accessibility, always aim to create captions. This ensures that viewers who are deaf or hard-of-hearing get the same rich experience as everyone else. We explore this in more detail in our guide on English translation with sound.
Mastering Timing and Line Breaks
Timing is everything. A subtitle needs to pop up the moment someone starts speaking and disappear right after they finish. Give your viewers enough time to read everything comfortably without feeling rushed, but don't let the text linger for too long after the dialogue ends.
A great rule of thumb I’ve learned is to keep a single line of text under 42 characters. If you need two lines, aim for a maximum of 84 characters total. This stops you from creating huge blocks of text that force people to read instead of watch.
When a sentence is too long for a single subtitle, you need to break it. Always split the line at a logical point, like after a comma or during a natural pause. Never break a sentence mid-thought—it’s jarring and makes the text much harder to follow.
Choosing the Right Export Format
Once your masterpiece is ready, you need to export it. You'll mainly run into two file formats: SRT and VTT. Knowing which to use will save you a lot of headaches with platform compatibility.
Subtitle Format Comparison
Here's a quick breakdown of the most common subtitle file formats and where they shine.
| Format | Key Features | Best Use Case |
|---|---|---|
| SRT (.srt) | The classic. It's the most basic and universal format, containing just timestamps and plain text. | This is your safest bet. It's supported by almost every platform you can think of: YouTube, Facebook, Vimeo, and LinkedIn. |
| VTT (.vtt) | A more modern format that lets you add styling like colours, bolding, and custom positioning. | Perfect for web videos where you want more creative control over how your captions look, especially with HTML5 video players. |
While VTT offers more bells and whistles, SRT is the reliable workhorse. For most social media and video-sharing sites, SRT is the go-to standard that will always work.
A Few Common Questions About Video Subtitles
Once you start subtitling your videos, a few questions always seem to come up. Nailing these details can be the difference between subtitles that help and subtitles that distract. Let's walk through some of the most common ones I hear.
How Long Should a Subtitle Stay on Screen?
This is all about finding the sweet spot. The golden rule is to give viewers enough time to read the text comfortably, but not so long that it hangs around awkwardly after the person has stopped talking. The industry standard is all about reading speed, which we measure in characters per second (CPS).
A solid benchmark to aim for is somewhere between 15-20 characters per second.
So, a short line like "Let's get started" (17 characters) should probably stay on screen for just over a second. A longer, two-line subtitle might need to be visible for anywhere from four to seven seconds. The real goal is to get into a natural rhythm that feels in sync with the speaker's pace.
What’s the Difference Between Open and Closed Captions?
This is a really important one, as it changes how your audience can interact with your video.
Open Captions: Think of these as being "burned into" the video file itself. They are a permanent part of the image, and viewers can't turn them off. This is perfect for platforms like TikTok or Instagram, where videos often autoplay on mute and you need to make sure the captions are always visible.
Closed Captions [CC]: These are a separate text file that the viewer can turn on or off using the video player's controls—like that little [CC] button on YouTube. This is the standard for accessibility because it gives the viewer a choice, making it the go-to for YouTube, Vimeo, and traditional broadcast TV.
The bottom line: Use open captions when you absolutely need them to be seen (like in sound-off social feeds). Use closed captions when you want to offer an accessible option without forcing it on every viewer.
Can I Just Add Captions Directly on Social Media?
Yes, absolutely. Most of the big platforms—YouTube, Instagram, TikTok—have their own built-in captioning tools these days, and they're surprisingly good for a quick job. They'll auto-generate subtitles for you right after you upload your video.
While these tools are super convenient for a quick post, they do have their limits. The accuracy can be a bit hit-or-miss, especially if there's background noise or you're using a lot of technical terms.
More importantly, you get almost no control over how they look. You're usually stuck with their default font and style. If you want professional-looking, branded content where your subtitles match your video's aesthetic, you're much better off using a dedicated tool before you upload. This gives you total control over the final look and feel.
Ready to create stunning, perfectly-timed subtitles in minutes? TranslateMom combines powerful AI transcription with a full-featured studio editor, allowing you to customize everything from fonts to karaoke-style animations. Start for free and see how easy it is to make your videos accessible and engaging for a global audience. Try it now at translate.mom.