At its most basic, translating voice to text is simple: you capture audio, run it through a service, and get written words back. This process is the key to making your content searchable, accessible, and ready for a global audience through subtitles or dubbing.
Why Translating Voice to Text Is a Content Game-Changer
Imagine connecting with millions of new viewers just by making your content understandable in their language. That's the real power here. It’s not just a technical add-on; it's a core growth strategy for anyone making content today.
From YouTubers to corporate trainers, creators are smashing language barriers to massively expand their reach. By offering translated subtitles or AI-dubbed audio, you're opening your message to entirely new markets and building a more inclusive community around your brand.
Expanding Accessibility and Reach
At its heart, turning voice into text is all about accessibility. It immediately helps individuals who are deaf or hard of hearing engage with your videos. It also serves people in noisy environments or those who just prefer watching with the sound off.
When you add translation into the mix, that accessibility goes global. Suddenly, audio content like Spanish language podcasts can find listeners worldwide. A video lecture in English can become a go-to learning resource for students in Japan, Brazil, or Germany.
This isn't just a "nice-to-have" for creators; it's becoming critical. In California, for instance, about 1 in 3 residents speaks a language other than English at home. That's a huge audience that needs content in their native tongue, highlighting a clear need for accurate voice-to-text translation in everything from public services to entertainment.
The Shift From Manual to AI-Powered Solutions
Not long ago, localizing your content was a huge undertaking. It was a slow, expensive process that involved hiring teams of professional transcribers, translators, and voice actors. For most independent creators and small businesses, it was completely out of reach.
Today, AI has completely flipped the script. Tools like TranslateMom put what is essentially a professional localization studio right into your browser. You can go from uploading a video to having accurate, editable subtitles in dozens of languages in minutes, not weeks.
This shift empowers anyone to think globally from day one. Let's take a quick look at how the old way stacks up against the new.
Voice to Text Translation Methods at a Glance
This table shows just how far we've come, moving from slow and pricey manual work to instant and affordable AI solutions.
| Method | Typical Speed | Cost | Accuracy | Best For |
|---|---|---|---|---|
| Manual Transcription & Translation | Days to weeks | High ($$$) | Very High | Hollywood films, high-budget legal/medical content |
| Freelancer Platforms | Hours to days | Moderate ($$) | Varies | One-off projects, non-urgent content |
| Basic Automated Transcription | Minutes | Low ($) | Good | Internal notes, rough drafts, single-language captions |
| AI-Powered Translation (like TranslateMom) | Minutes | Very Low ($) | High | Content creators, marketers, educators, businesses |
The benefits of the modern AI approach are clear:
- Speed: Get translations in minutes, not days.
- Cost-Effectiveness: Cut your localization budget by up to 90% compared to manual services.
- Scalability: Translate your entire content library, not just a handful of videos.
- Control: Tweak every word and timestamp yourself with easy-to-use editors to ensure everything is perfect.
This new reality makes multilingual content a standard practice rather than an expensive afterthought.
Preparing Your Audio for Flawless Translation
Ever heard the old saying, "garbage in, garbage out"? It's the absolute truth when you translate voice to text. The quality of your final subtitles or dubs hinges almost entirely on the clarity of your original audio. AI is incredibly smart, but it's not a mind-reader—it can only work with what it can clearly hear.
Think of it like this: an AI transcription engine is like a person listening carefully in a silent room. If you speak clearly, they'll catch every single word. But if you mumble, stand too far from the mic, or have a noisy air conditioner humming in the background, they're going to struggle. This is exactly why spending just a few minutes prepping your audio will save you hours of painful editing down the line.
A clean audio file lets the AI nail down words, punctuation, and even who's speaking. That means a much more accurate first draft for you, so you can spend less time fixing mistakes and more time perfecting your message.
Mastering Your Recording Environment
You don't need a fancy, sound-proofed studio. You just need to control your space. The main goal is to isolate the speaker's voice from everything else. Even tiny background noises that you might not notice can throw off an AI, causing it to mishear words or get timestamps wrong.
- Find a Quiet Spot: A small office or a bedroom with carpets and curtains is usually a much better choice than a big, echoey kitchen with hard floors.
- Kill the Distractions: Switch off fans, air conditioners, and any other buzzing devices. Shut the windows to block out street noise. A quiet recording is the bedrock of a great translation.
- Dampen the Echo: Rooms with lots of hard surfaces (walls, desks, windows) create reverb, which makes audio sound muddy. Soft things like rugs, couches, and even tapestries on the wall will soak up that sound and make your voice much clearer.
If you're stuck recording in a noisy place, don't sweat it. You've still got options. You can learn how to remove background noise from audio to clean up your files before you even start the translation.
Microphone Technique Matters
How you use your microphone is just as crucial as the room you're in. I've seen people with expensive mics get terrible results simply because their technique was off. Proper placement is everything if you want to capture a rich, clear voice that an AI can easily understand.
Pro Tip: Try positioning your microphone slightly off to the side of your mouth, about 6-8 inches away. If you speak directly into it, you'll get "plosives"—those harsh puffs of air from letters like 'P' and 'B' that make the audio clip.
Another killer is crosstalk, especially in interviews or podcasts. This is when one person's voice bleeds into another's mic, completely confusing the AI about who said what. The ideal setup is giving everyone their own microphone. If that's not possible, make sure people take turns speaking and try their best not to talk over each other.
By focusing on these two simple things—a quiet room and good mic technique—you're giving the AI the best possible starting point. This little bit of prep work is the most important step you can take to get a fast, accurate, and professional-looking result when you translate voice to text.
Your Workflow for Translating Voice to Text
Once your audio is clean and ready to go, it’s time to get down to the real work: turning those spoken words into perfectly timed, multilingual text. I’ll walk you through how a professional-grade tool like TranslateMom makes this whole process feel less like a chore and more like a creative project.
The entire journey is framed as a "Task," which keeps everything organized. Whether you're working on a quick social media clip or a feature-length interview, this approach keeps you focused as you move from your raw file to the final, polished product.
Getting Your Media into the System
Everything kicks off on the New Task screen. The goal is simple: get your audio or video file loaded up so the magic can begin. You’ve got a couple of handy ways to do this.
- Direct File Upload: This is the old-school, reliable method. Just drag and drop your video files right into the browser. If you're more of a keyboard person, hitting the
Fkey brings up your file picker instantly. The system can handle pretty big files, often up to 5GB, so there's no need to compress your high-quality footage. - Import via Link: This is a huge time-saver if your content is already online. Instead of downloading and then re-uploading, you can just paste a URL from places like YouTube, Twitter (X), TikTok, or Instagram. The app fetches it for you.
This first step is all about speed, letting you get a project started in just a few seconds. This kind of efficiency is becoming critical. Just look at California's state courts, where remote and telephonic interpretation skyrocketed post-pandemic, hitting over 58,000 interpreter events in 2021 alone. All of that relies on clear, fast voice capture and transcription.
Configuring Your Translation Project
With your video loaded, you'll move on to the setup. This is where you tell the tool exactly what you want it to do with your file.
First, you’ll pick the Source Language—that’s the language being spoken in the video. Next, choose your Target Language, which is what you want the subtitles or new audio track to be in.
After that, you select the service you need:
- Transcription: The most basic option. It simply creates same-language captions from your audio.
- Translation: This is a two-step process. The tool first transcribes the original audio and then translates that text into your target language to create subtitles.
- Dubbing: This is the full package. It transcribes, translates, and then generates a brand new AI audio track in the target language, effectively dubbing your video.
This infographic breaks down the crucial prep work that should happen before you even get to this stage.
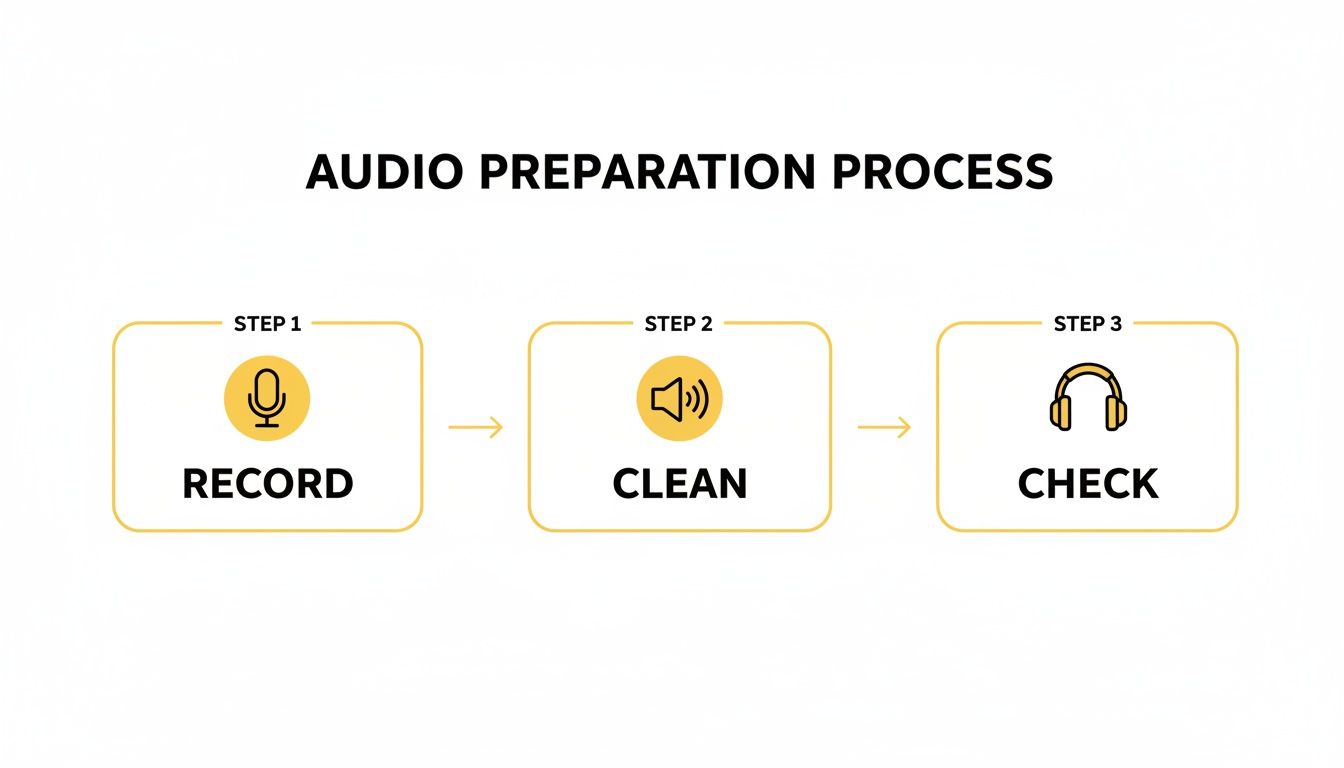
Getting the recording, cleaning, and checking right from the start lays a solid foundation for everything that comes next.
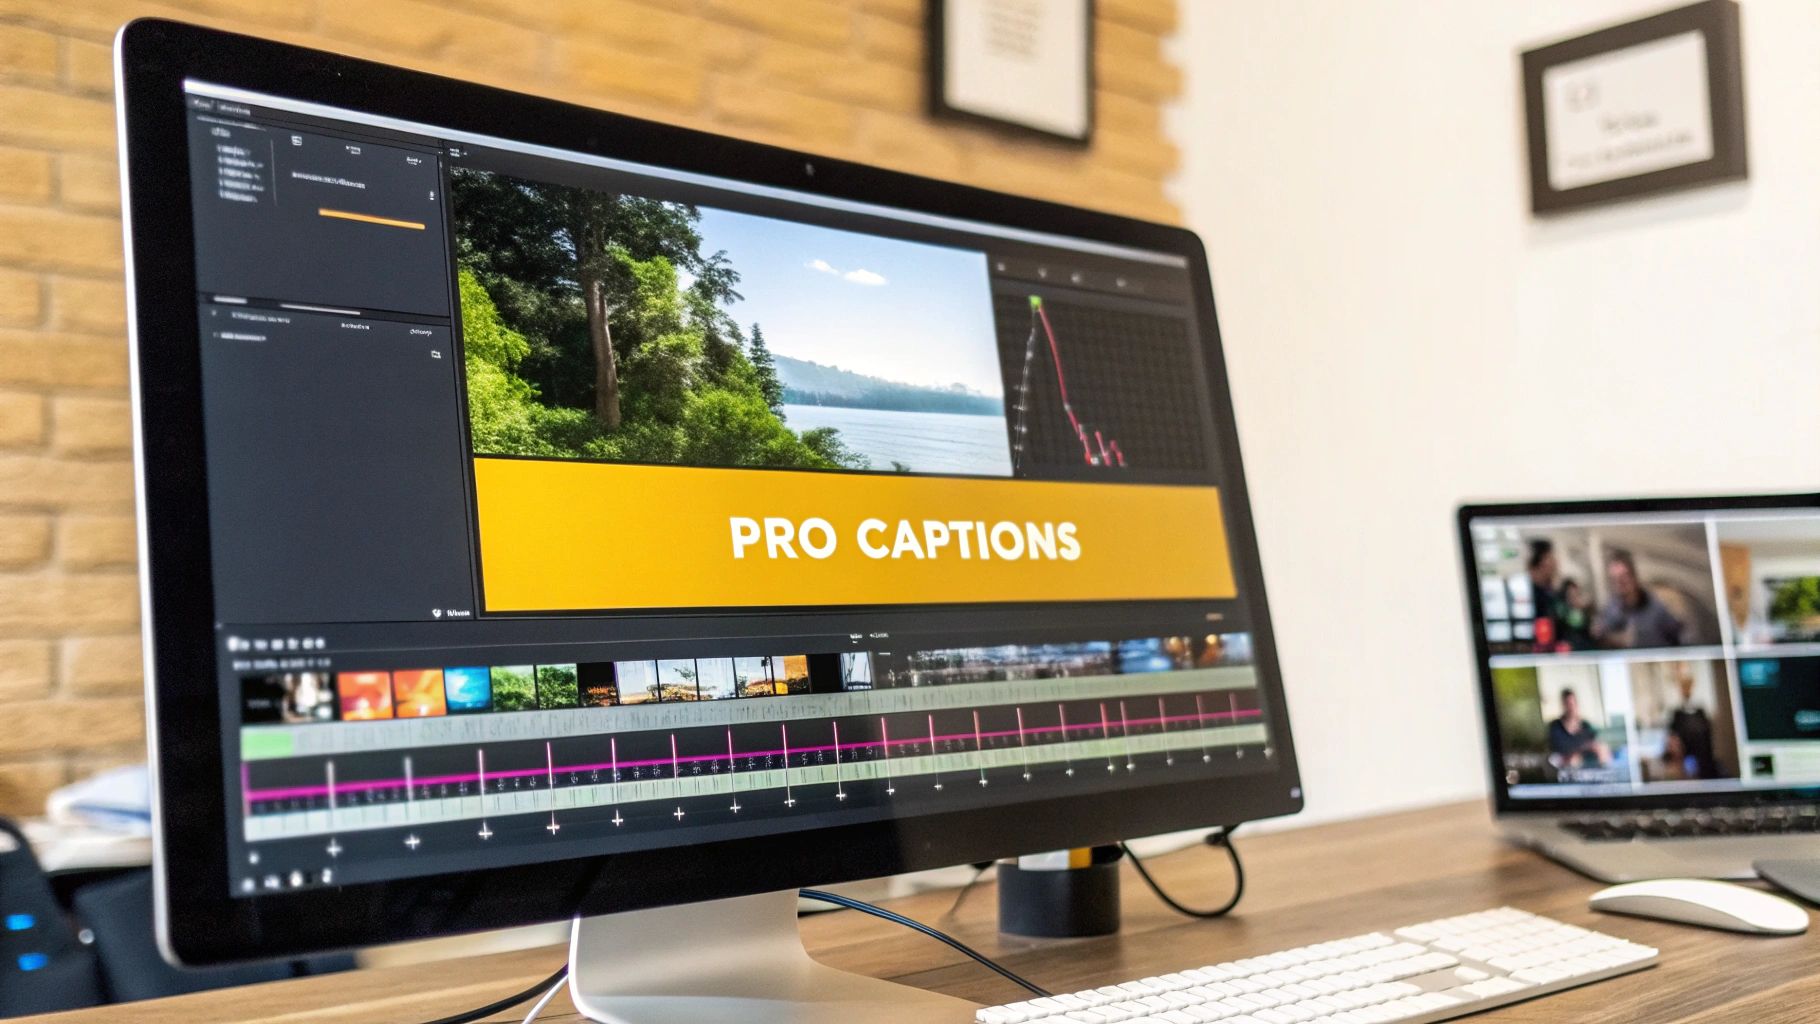
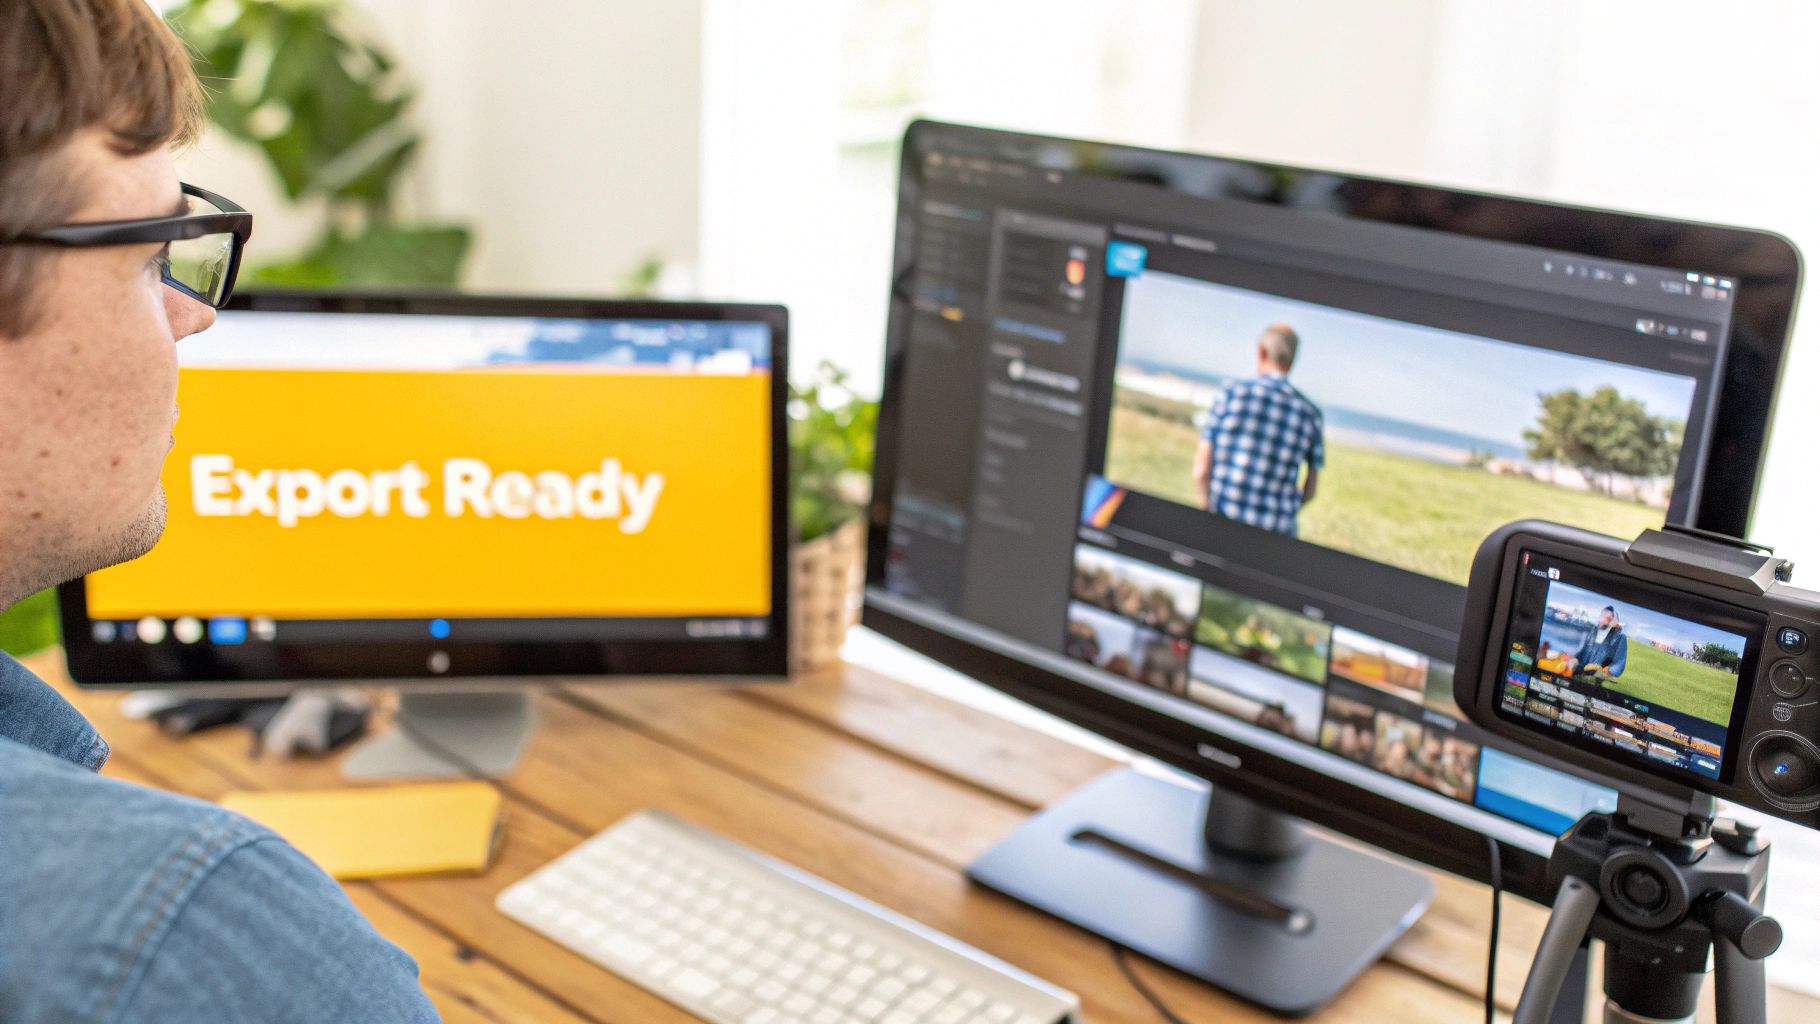
The Studio Editor Deep Dive
Once the initial processing is done, you’ll land in the Studio Workspace. This is where you'll spend your time fine-tuning the AI's output to get it just right. The whole interface is built for both speed and precision.
On the left, you’ve got a Special Player that gives you a live preview of exactly how your subtitles will look on screen.
On the right is the Subtitle Editor, a list of every single caption. You can click on any line to edit it on the fly. One of my favourite features is that the video automatically pauses the moment you start typing, which lets you focus without fumbling with the play/pause button.
Power User Insight: Use the visual audio Waveform to get your timing perfect. You can literally see the spoken words as peaks and valleys, allowing you to drag the start and end points of a subtitle to match the audio with millisecond accuracy. This is the secret to getting rid of awkward timing issues.
For translators, the Split View is a lifesaver. It displays the original text right next to your translated version, making it easy to cross-reference and make sure you’re capturing the original nuance.
When you're dealing with transcribed text as part of a larger project, dedicated online platforms like the Polychat App's Translator tool can be a great complement to your workflow. And while the workflow itself is important, having the right tool is even more so. You can learn more in our guide on the best transcription tool for 2025.
Advanced Techniques for Professional Results
Alright, once you've nailed the basic workflow to translate voice to text, it’s time to level up. We're moving beyond just getting the words right and into making your content look and feel exceptional.
This is all about the details—the visual polish and branding that helps your videos pop in a crowded feed. Modern tools give you features that used to be reserved for professional video editors, making it easy to create high-quality, branded content that really connects.
Creating Engaging Karaoke-Style Captions
One of the best ways to grab and hold attention, especially on platforms like TikTok and Instagram Reels, is with dynamic "Karaoke" style captions. You’ve seen them—the words highlight in real-time as they’re spoken, pulling the viewer's eye right where you want it.
This animation style is a lifesaver for keeping people engaged, particularly when they're watching with the sound off. In a tool like TranslateMom, you can find this feature right in the Style tab inside the Studio editor. You can pick from presets or tweak the animation, colour, and timing to perfectly match your brand's vibe.
The cool part is the app's Smart Sync technology. It automatically tracks the timing for each word, so even if you go back and edit the text, the animation adjusts itself to stay perfectly in sync.
Applying Your Brand Identity
Consistency is everything when you're building an online presence. A really simple but effective way to do this is by adding a custom logo or watermark directly to your videos. It’s a small touch that ensures you get credit, even when your content gets shared or reposted.
Inside the TranslateMom Studio, you can handle this in the Brand tab. It couldn't be more straightforward:
- Upload: Just pop your logo image file in.
- Position: Drag and drop it to any corner or even the centre of the frame.
- Resize: Tweak the size and opacity so it’s visible but doesn't get in the way of the main content.
This little step adds a huge dose of professionalism and helps build brand recall every time someone hits play.
Expert Insight: Think of branding as more than just a logo. Use the Style tab to set a consistent font family, colour palette, and background for your subtitles. A unique and consistent caption style can become as much a part of your brand identity as your logo itself.
Unlocking Bilingual Content for Language Learners
Here’s a powerful, often-overlooked use for voice-to-text translation: creating content for language learners. By showing both the original and translated languages at the same time, you create an amazing resource for students trying to connect spoken words with written text.
This is where a Dual Language Mode is a total game-changer. This feature stacks the source language (like English) and the translated language (like Spanish) right on top of each other in the video. A viewer can see the direct comparison, helping them pick up on phrases, grammar, and vocabulary in context.
In TranslateMom, you can flip this feature on to create compelling educational content that serves a really dedicated audience. It turns a standard subtitled video into a proper interactive learning tool.
Streamlining Team Collaboration and Quality Control
When you're working on bigger projects or with a team, keeping quality and consistency high is a must. Modern translation platforms are built for this, with features designed to make collaboration smooth and protect your work from mistakes.
These tools are built for a team environment, not just a single user.
- Suggestion Mode: Instead of team members directly overwriting text, they can "suggest" corrections for subtitle lines. These suggestions are saved for a project lead to review and approve, creating a clear and accountable editing workflow.
- Cloud Sync and Version History: All your edits are saved to the cloud automatically and in real-time. You can close your browser and pick up exactly where you left off. Even better, a History log tracks previous versions of your subtitles. If a big mistake happens, you can easily restore your work to an earlier point—a critical safety net.
Exporting and Sharing Your Multilingual Content
Alright, you've done the hard work of translating your audio and perfecting your subtitles. Now for the final, most rewarding part: getting it out into the world.
How you export your finished project really depends on where it's going to live. A video destined for Instagram has totally different technical needs than one for a YouTube channel or a professional editing workflow. Nailing this last step ensures your content looks and works perfectly, no matter the platform.
Burn-in vs. Sidecar Files
You've got two main paths for delivering subtitles, and picking the right one from the get-go will save you a lot of grief.
Burn-in (Export Video): This method permanently "bakes" your stylized subtitles right onto the video frames. The final product is a single video file, ready for action. This is my go-to for social media like Instagram, TikTok, and X (formerly Twitter), where people often watch with the sound off and there’s no option for viewers to toggle captions.
Download Subtitles (Sidecar Files): This option gives you a separate text file that contains all your captions and their timing cues. The most common formats are SRT and VTT. This is the ideal choice for platforms like YouTube and Vimeo, which let you upload these "sidecar" files with your video. It gives your audience control—they can turn captions on or off—and it makes the text in your video searchable.
Inside a tool like TranslateMom, you can do both right from the editor. When you hit Export Video, the app's servers will render a fresh MP4 file with everything—your captions, logos, and any cool karaoke effects—locked in place.
Choosing the Right Subtitle Format
If you're going the sidecar route, you need to pick the right file format. They might all look like simple text files, but they're built for different jobs.
SRT (.srt): This is the OG, the most universally accepted format out there. It’s simple, reliable, and works with pretty much every platform and video editor you can think of, from YouTube and Facebook to Adobe Premiere Pro. It just contains the essential timing and text.
VTT (.vtt): Think of VTT as the modern, more capable sibling to SRT. It supports extra features like text styling (bold, italics), different positioning, and other metadata. VTT is the preferred format for modern web video players and platforms like Vimeo.
Advanced Formats (.ass): These are for when you need to get really fancy with styling and animation, like you often see in fan-subtitled anime. They offer incredible control over fonts, colours, and positioning, but they aren't widely supported.
Key Takeaway: When in doubt, SRT is your safest bet for maximum compatibility. If you want more creative control for web-based video, VTT is the way to go. Most pro-level tools, including TranslateMom, let you download multiple formats so you're covered for any destination.
This final stage is all about connecting your carefully translated content with the global audience it was meant for. By choosing the right export options, you make sure your message lands clearly and professionally, everywhere.
Making Sense of AI Translation Costs
When you're thinking about translating your audio or video content, it's not just a creative choice—it's a business decision. The big question is always about the return on your investment. How do today's AI-powered tools stack up against the old-school, manual way of doing things?
The difference is night and day.
It wasn't long ago that professional translation was a massive expense, really only an option for big companies with deep pockets. You had to hire transcribers, translators, and project managers. The whole process was slow, complicated, and incredibly expensive. But now, AI has completely flipped the script, making it possible for anyone—from solo creators to small businesses—to reach a global audience.
The Real-World Savings of AI
The most obvious win with AI is how much time and money you save. A project that would take a human team days, or even weeks, can now be done by an AI in minutes. And it costs a tiny fraction of the price. This isn't just a small step forward; it's a huge leap that opens up the entire world to creators who were previously locked out.
We're even seeing this shift in major public institutions. Take the city of San Jose, California, for example. They used to budget around $400,000 a year for human interpreters. After switching to an AI platform, that annual cost plummeted to just $82,000. That’s an almost 80% reduction in spending, and they expanded their language support from eight to fifty-eight languages. It's a powerful demonstration of doing more with less.
How Modern AI Pricing Actually Works
To really get the value, it helps to understand how a tool like TranslateMom prices its services. Forget about getting locked into expensive contracts or paying high per-minute rates. Most modern platforms, including ours, run on a flexible, credit-based system.
This model is simple: you only pay for what you actually use. Different tasks "spend" a different number of credits.
- Transcription: This is your most budget-friendly option. It just turns audio into text, so it uses the fewest credits per minute.
- Translation: This takes a few more credits because it's a two-step AI process. First, it transcribes the audio, and then it translates that text into your chosen language.
- Dubbing: As the most complex service, AI dubbing uses the most credits. It has to transcribe, translate, and then generate a whole new, natural-sounding audio track.
This pay-as-you-go approach puts you in total control of your budget. You can start with one video and scale up as you grow, without any scary upfront investment. If you want to dive deeper into the tech, our guide on choosing an AI video translator is a great place to start.
A credit system turns localization from a huge, unpredictable expense into a simple, scalable utility. You can figure out exactly what it'll cost to go multilingual and weigh that against the value of reaching a whole new audience.
For most people, the math just works. The small cost of AI translation is easily covered by the huge value you get from more views, new markets, and better accessibility for your audience. It's one of the smartest investments you can make in your content today.
Ready to see it in action? With TranslateMom, you can subtitle, translate, and dub your videos in just a few minutes, opening up your content to the world without emptying your wallet. Start for free and see what AI localization can do for you.